How to Use SyncBack to Enhance WordPress Security
Table of Contents
WordPress' popularity makes it a preferred target of malicious hackers looking to make a quick buck. And much has been written about how to harden WordPress against such attacks, but there's one tactic that I've yet to see covered and that is how do you detect and correct changes to your WordPress files be they core, theme, or plugin files? There are a couple of plugins that look for changes to core files, but they ignore themes, plugins, and other files so they fall short, in my opinion, in this regard. There's where SyncBack comes in (free version available too). This program enables you to synchronize files between two locations such as your laptop and your web site via FTP. So if you maintain a copy of your WordPress site's files locally and have FTP access to your site, you're all set to kick-up security a notch.
Step 1 – Understand Your Folder Structure
Identify the folders of your WordPress installation where your local copy is the copy of record. In my case, since I make all edits locally, these web site folders should always match what I have locally:
- /
- /images/
- /wp-admin/ and all sub-folders
- /wp-content/ except for cache config file
- /wp-content/themes/ and all sub-folders
- /wp-content/plugins/ and all sub-folders
Then identify folders where the web server has the latest version. For me, that's the backup folder which I won't reveal here.
Step 2 – Configure A Profile
For each of the folders above, create a synchronization profile in SyncBack. Obviously, the more granular you want to be the more profiles you'll have to create. I tried to keep things as simple as possible. Here's a partial list of my profiles.

While you're setting up these profiles, pay special attention to the Decision options (see below). You can streamline processing if you set the rules to make decisions for you. For example, do you want to delete all files on the web server in the /wp-admin/ folder that you don't have locally? Probably, yes. If in doubt what Decision to select, choose Prompt me. At first this will result in a lot of interaction from you when you execute the profile, but eventually you'll learn what should be automated.

SyncBack will also identify files that exist in both locations, but are different. This feature will catch modified files that shouldn't have been modified.
Step 3 – Run Your Profile
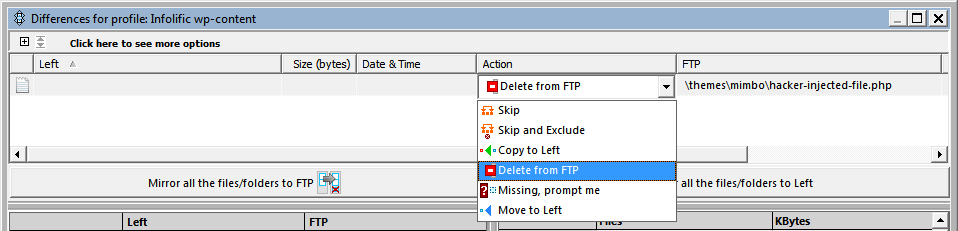
Once you've created a profile, test it out before you create others. This'll help you identify configuration mistakes before you make them in a bunch of profiles. SyncBack will start by comparing all the files and folders specified in the profile and then prompt you to make a decision for any differences it finds. Here's an example of a file found on my web server that doesn't exist locally. In this case I want SyncBack to delete this file!
Step 4 – Sync Your CDN (Optional)
If you host some of your files on a CDN, Syncback makes it easy to keep the CDN in sync too. Just copy the profiles you created and change the destination path. In my case, nothing should ever be on the CDN that isn't local and so I really just need a single profile to copy updates to the CDN and delete files on the CDN that don't belong.
Step 5 – Run Profiles Regularly
Without doubt the first execution or two of your profiles will seem tedious. However, once you've learned what options to select to minimize the need for manual input, you'll be able to do this in 5 minutes. I like to run this at least weekly. And so far, all good!

Leave a Reply