Improving WordPress Performance
I have to admit that my obsession with having this site perform as quickly as possible is perhaps a bit of a time suck. There's no doubt in my mind that the more time I was putting into performance tweaks was having less and less of an impact. Still, whenever I used WebPageTest.org I couldn't help but feel egged on to correct any score that wasn't perfect. And after many hours over the course of many months, I've finally managed to find the right combination of enhancements.
Firstly, let me say that I tried the W3 Total Cache plugin and had many problems with it. I never got it to the point where it worked consistently over a long period of time and often my site wouldn't load correctly. Many have had better success with it and that's cool, but I made the decision to head down another path. And that path was with WP Super Cache which I found to be much more stable and far easier to configure. Unfortunately, it didn't have as many features built-in so I had to come up with alternatives to make up for the plugin's shortcomings.
Secondly, I have yet to crack the secret to combining JS and / or CSS files without causing problems. I've tried various plugins including the seemingly ubiquitous WP Minify. I've, for the time being, given up on that tactic.
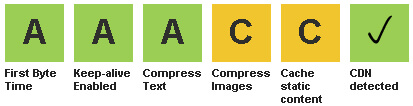
Before I get into more detail for all of the steps I took, here's what you can expect for a score. Not quite perfect, but the two C grades are out of my control. They're a result of some stuff coming from facebook.com, twitter.com, and google.com i.e. files I can't control. Bummer. In addition to the WebPageTest score, this site scores 90/100 on Page Speed v1.12.
Install WP Super Cache
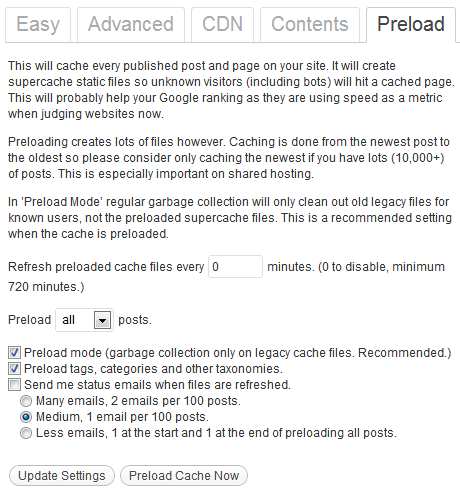
The first step is to install the WP Super cache plugin. Once installed, go through the advanced settings and make sure that anything marked as recommended is selected. In addition, go to the Preload tab and set the options as shown below. With these settings there is no garbage cleanup and preloading won't actually happen until you click on the Preload Cache Now button. I find this set up useful as my content doesn't change so much that I need pages re-cached regularly.
Modify Your .htaccess
Add these additional lines to your .htaccess file. WP Super Cache should compress files, but these will catch anything that WP Super Cache doesn't handle.
# compress text, html, javascript, css, xml

AddOutputFilterByType DEFLATE text/plain

AddOutputFilterByType DEFLATE text/html

AddOutputFilterByType DEFLATE text/xml

AddOutputFilterByType DEFLATE text/css

AddOutputFilterByType DEFLATE application/xml

AddOutputFilterByType DEFLATE application/xhtml+xml

AddOutputFilterByType DEFLATE application/rss+xml

AddOutputFilterByType DEFLATE application/javascript

AddOutputFilterByType DEFLATE application/x-javascript
Also, add these lines which will set an expire time of one 1 day on all files delivered by your web server.
# expires caching


ExpiresActive On

ExpiresByType image/jpg "access plus 24 hours"

ExpiresByType image/jpeg "access plus 24 hours"

ExpiresByType image/gif "access plus 24 hours"

ExpiresByType image/png "access plus 24 hours"

ExpiresByType text/css "access plus 24 hours"

ExpiresByType application/pdf "access plus 24 hours"

ExpiresByType text/x-javascript "access plus 24 hours"

ExpiresByType application/x-shockwave-flash "access plus 24 hours"

ExpiresByType image/x-icon "access plus 24 hours"

ExpiresDefault "access plus 24 hours"
Sign Up for Amazon's CloudFront
CloudFront is Amazon's content delivery network service. You can go with another CDN, but Amazon has the advantage of being a well-known offering backed by a company you know won't be going away anytime soon. Signing up is fairly easy, but admittedly setting everything up can be a bit tricky.
In summary, you first need to create subdomain on your server, then create a distribution that pulls from the subdomain as the origin, and then you have to add a CNAME record to your DNS pointing to the distribution. The full detail for each of these steps are beyond the scope of what I can describe here, but a CDN is an important part of making your site perform at its best so the effort is likely worth the trouble.
Load Files from Your CDN
Once you have a CDN set up, you need to place files on it that are static (e.g. CSS, JS) and then have your WordPress install reference those files. To upload files to Amazon's CloudFront, you can use Amazon's interface or download a program like the Amazon S3 Explorer from CloudBerry Lab (the free version is sufficient for my needs).
For simplicity, I uploaded my theme and plugin folders. All of the JS and CSS files that I want to have called from the CDN are contained within these folders and uploading everything was easier than tracking down and uploading individual files.
So with files on the CDN, the goal was then to adjust every URL that loads static content so that it points to the CDN. For example, a file that was previously loaded from here:
infolific.com/somefolder/somefile.css
Should be called from the CDN like this:
cdn.infolific.com/somefolder/somefile.css
To accomplished this I used the Real-Time Find and Replace plugin. This is actually one of my plugins and I used for a lot of things in addition to configuring my site for use with a CDN. I wrote a post on some of the ways to use this plugin. Once the plugin is installed I set up find and replace rules that changed any URLs that loaded CSS and JS files from my server to URLs that load them from Amazon.
Final Considerations
Tweaking your site is going to hit limits if you don't put the right hardware behind it. If you're serious about your efforts, I'd recommend using a VPS that you can scale up (and down) if needed.
If your site is image heavy, considering running your images through SmushIt, a lossless image compression service from Yahoo. My own testing suggests you can shave off 10% to 20% from the original file size.
Block search engine crawls from the subdomain you created via robots.txt. No need to have those files crawled.
Also, be sure to upload the .htaccess to your subdomain with the expire and deflate rules so that when that content is pulled by CloudFront the appropriate headers are set.


Leave a Reply