Wiring the Trunk and Branches of Bonsai
Table of Contents
Wiring the Trunk
- Choose wire of the correct thickness. Cut it to length, and push one end into the soil behind the trunk of the tree.
- To anchor the wire securely, bend it around the trunk almost parallel with the soil in the container.
- Wind the first coil of wire around the trunk. Continue to wind up the trunk at an angle of 45 degrees.
- If a second wire is necessary, wire it close to the first. Do not allow it to cross the first wire, or it will be ineffective.
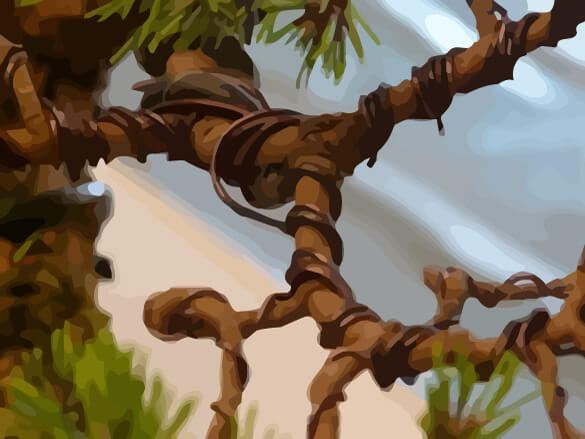
It is important to anchor the wire securely, or it will not be effective. When wiring a low branch or trunk, anchor the wire in the soil of the container. For branches higher up the tree, the common practice is to use the same piece of wire to work on two branches at once, after taking a turn with the wire around the trunk for anchorage.
Do not cross wires: not only will they not look attractive, but they may bite into the wood and act as a tourniquet, cutting off the limb's sap and killing the upper part.
It is usual to start wiring at the heaviest part of the tree, and work up to the most delicate areas; if you have to wire the trunk, start with that and move on to the branches.
Wiring Branches
Once the trunk of the bonsai tree has been fully wired, you can start on the branches. Always wire the branch at the lowest level on the trunk first and work upward.
There are two schools of thought in the bonsai world about how to wire branches. One of the preferred techniques is to wire the length of each branch with its principal wire and continue until you have finished the whole tree. You follow by adding subsidiary wiring to shape the finer twigs – again beginning with twigs on the lowermost branches. The second method is to complete the wiring of one branch at a time, applying both its main and subsidiary wires before starting on the next branch. Whichever method you choose, make sure your wiring is precise and neat.
Beginning to Wire
Take the first turn of wire over the branch as shown on the left. If you start by passing it underneath, as seen on the right, there is a tendency for the branch to snap when bent.
Anchoring Wire to a Lone Branch
Where a limb is too isolated to be wired together with another branch, secure the end of the wire by trapping it under the first few turns.
Wiring Two Branches at the Same Time
The usual practice is to wire two branches with one wire. Take the wire around the trunk between one branch and the other to keep it firmly in place.
Creating a bend in the trunk
When a trunk is to be bent into a curve, the maximum support is needed at the outer point of the curve. The support of the wiring is weaker between spirals.
Changing the Gauge of the Wire
As a trunk or branch tapers, you will need to change to a wire with a smaller gauge. Run the thinner wire alongside the thicker one for a number of turns, to secure it and to ensure that it adequately supports the taper. This technique also is used to bring a thin branch up to form the apex.
Anchoring Subsidiary Wiring
Even support
When it is necessary to wire just the twigs, not the branch, the wire is anchored at the division of branch so that the join is evenly supported.
Uneven Support
If a pair of twigs is wired so that the wire spirals around the division of the branch, as seen here, the join is not evenly supported and might very easily suffer damage.
Wiring the Whole Branch
Where it is necessary to wire the complete branch, as well as the twigs, the wire is anchored by a couple of turns at the trunk.


S irs:
The wiring description of secondary branches needs some detailed photos: If the trunk is wired, in some cases, cross wiring for secondary branches may not be able to be avoided.
Thankyou,
john scott