Bonsai Root Pruning and Repotting
Table of Contents
After a few years, the roots of a bonsai completely fill the pot. When an ordinary pot plant is “pot-bound” like this, you simply pot it on into a bigger container with more soil. When repotting a bonsai, however, you will want to retain the original container that you chose so carefully to complement the tree. You therefore prune the bonsai's roots, so that you can add some fresh potting soil when you replace the tree in its original pot.
Such root pruning of bonsai is popularly, but erroneously, thought to result in stunting or dwarfing of the tree. In fact, a root-pruned bonsai grows more vigorously because the extra soil allows new, fibrous feeder roots to develop from each cut root. Inspect the rootball annually to see if root pruning is necessary.
Root Pruning
The aim of root pruning is to trim the roots into a flat root system that will fit comfortably back into the pot. It is usually done in spring, but Japanese larches like this Larix kaempferi are hardy enough to be tackled in mid to late winter, if the soil is not frozen. Return the repotted tree to an open position; frost protection is usually unnecessary. Larches grow fast and dislike being pot-bound, so they usually need annual root pruning. When making the wedge-shaped cuts in Step 3, do not damage any surface roots that show above the soil: the shape and spread of the exposed roots on a mature bonsai are an important part of the design and should not be destroyed.
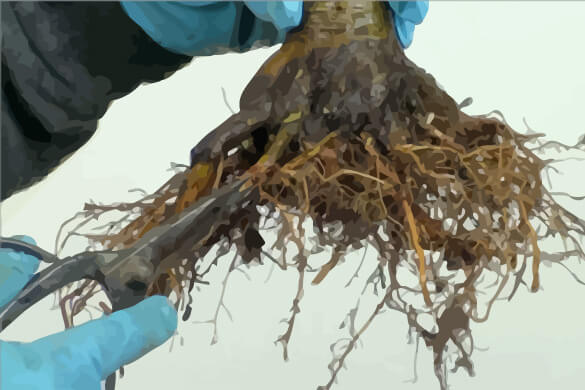
Checking the Rootball
Inspect tin- tree each year to see if root pruning and repotting are necessary. Cut the anchorage wires and ease the plant from the pot, tilting it to check the underside of the soil. If there is a dense mass of long roots coiled around the rootball, they need to be pruned, and the tree must be repotted.
Root Pruning Technique
- Use a metal root hook to comb out roots gently. Do not damage the surface radial roots.
- The long, circling roots need to be cut away with shears. Trim roots on the underside.
- Cut out wedge-shaped sections from the rootball. This stimulates fibrous roots by the trunk.
Repotting a Bonsai
When you repot a bonsai, you will usually replace it in its original container. After removing the tree, you should clean the pot thoroughly. Use a stiff brush to remove any potting soil clinging to the inside of the container. Frequently, this is all that is necessary, but if the pot is still dirty, scrub it out thoroughly with a little washing-up liquid dissolved in clean water.
It is not horticulturally necessary to change the bonsai's container when you repot, although you would do if it were an ordinary plant whose roots needed to expand into a larger area. Sometimes, however, you may feel the container does not suit the design of the bonsai as well as you originally thought, so take this opportunity to use a different pot. In this example, it was decided that a plainer pot would suit the larch better than its original, more rounded one.
Whether you use a new container or the old one, insert or refurbish the plastic mesh over the drainage holes. Do the same with the anchorage wires, before covering the bottom of the container with an even layer of a potting soil suitable for the species. After any necessary root pruning, replant the tree.
Repotting the Specimen
- Position the bonsai in the prepared pot to give the required front view. Fix it in place with the anchorage wires, bringing them up and over the rootball and twisting them together.
- With a chopstick, thoroughly work more soil mixture into the root mass. Push it well down into the cut sections. Keep adding soil until it reaches just below the rim of the container.
- Give the tree a thorough watering. Place pads of damp moss on top of the soil and press them down with a small trowel.
Soil Mixtures for Bonsai
Different bonsai require different types of soil. A good potting soil should be able to retain enough moisture for the roots to absorb what they need. However, the soil should also be sufficiently well-draining to prevent the soil from becoming waterlogged and causing root-rot. The soil texture should be loose and open enough to help retain the moisture, and to provide good ventilation, so that oxygen circulates and enables the roots to “breathe”.
With experience, you will learn to mix your own potting soil. The ingredients of the three mixes are as follows.
- Basic soil mix: One part loam, two parts sphagnum peat moss, two parts granite grit.
- Free-draining soil mix: One part loam, one part sphagnum peat moss, three parts granite grit.
- Lime-free (ericaceous) soil mix: One part loam, three parts sphagnum peat moss, one part granite grit.
Fertilizers will scorch new roots, so you should not feed a repotted or newly planted bonsai until two or three weeks after the initial new growth of spring. Once the plant is established, you can add any necessary nutrients.


Leave a Reply