Ride Your Bike Indoors Using a Turbo Trainer or Roller
Table of Contents
Don't let the winter months ruin all of your valuable gains from the in-season! Unless you are lucky enough to live in a snow-free climate, there will be periods, perhaps months at a time, where going outside for a bike ride is just not practical or even dangerous. And although weights and the treadmill are good activities, they are not sport-specific enough to maintain the cycling gains you've made. So, what do you do? Ride indoors. If you have a gym nearby that offers spin classes, perfect. But even if you don't, you can ride indoors in the comfort of your own home using your own bike mounted on a turbo trainer or roller.
One of the first indoor trainers was the ‘A' frame wind trainer which was followed by variations that used magnetic resistance and then fluid resistance. Along the way, Rollers were created. And most recently the Direct Drive.
 Turbo Trainer
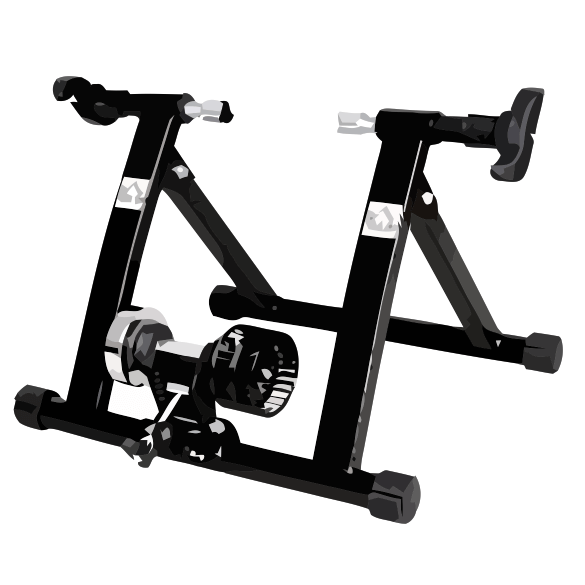
‘A' Frame Turbo Trainers
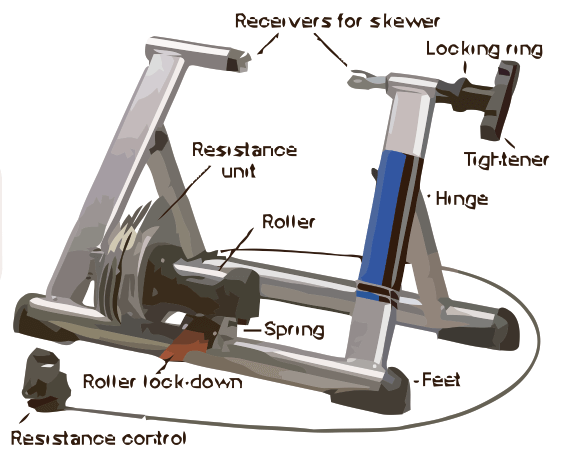
‘A' Frames get their name from their appearance when set up i.e. their shape is that of an A. These are by far the easier trainers to use, and are the most versatile. Best of all, most of them fold almost flat when you are not using them allowing them to be tucked away. They are composed of skewers and a locking ring which hold the rear wheel of bike in place, a roller which your rear wheel rolls on, an adjustable (up and down) resistance unit, and the frame itself.
 Turbo Trainer with Wind Resistance
Wind Resistance
These were the first trainers that came out and they've been on the market for quite a while. The resistance comes from air friction as a wind rotor rotates while you pedal. Standing close by feels and sounds a lot like stand beside a fan. They are fairly inexpensive and make for a good entry point. However, the major downside is that they are quite noisy. It's unlikely your use of a wind-based trainer will go unnoticed by others in your home or by your neighbors. You will also have a hard time listening to music or hearing the dialogue of a movie. Two more things to consider: there is no way to adjust resistance except by changing gears and the rear tire will wear out quite quickly so I recommend you use a separate cheaper tire.
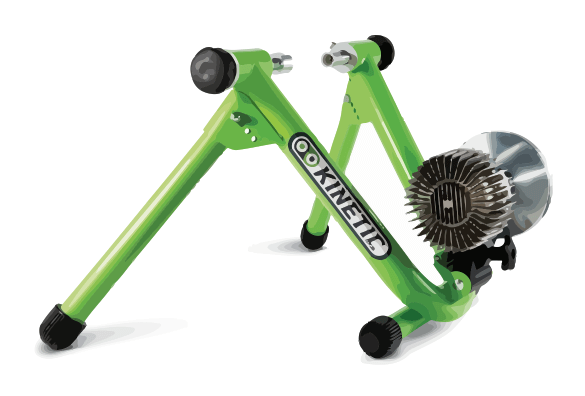
 Turbo Trainer with Progressive Magnetic Resistance
Magnetic Resistance
These are a bit more expensive than the wind resistance trainers, but still inexpensive enough for most riders to be able to afford. The main difference is that the resistance is created by resisting magnets enclosed in a unit. They are quieter than wind trainers, but still noisy and they are not much more realistic in terms of feel. Some magnetic trainers have adjustable resistance via a lever you attach onto the handlebars or the resistance is progressive i.e. the harder you pedal the more resistance is created, which is the same as when you ride on the road.
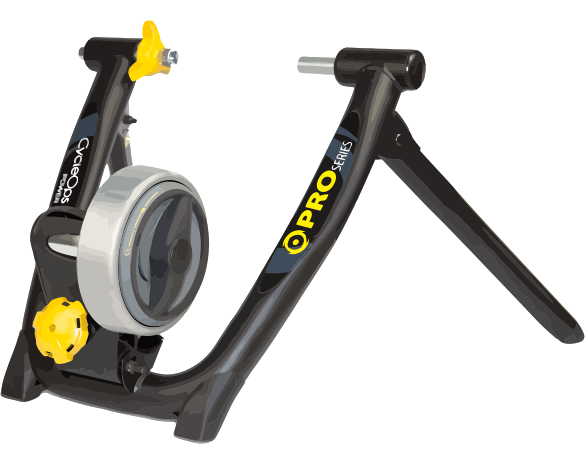
 Turbo Trainer with Fluid Resistance
Fluid Resistance
The next step up uses fluid to provide resistance. And as you might expect, these types are more expensive. On the plus side, they are very quiet and more realistic feeling than the two above. The resistance is created by fluid in an enclosed unit which contains a rotating fan. Older models sometimes used to leak fluid, but this is not an issue with newer models. These trainers also offer progressive resistance, similar to magnetic trainers. As with the other ‘A' frame trainers, your bike's rear tire will wear out quickly.
 Turbo Trainer Block
For all ‘A' trainers you will need a method of raising the front wheel to make it level with the rear wheel. You can purchase a specifically made block or make your own.
If you plan on using a mountain bike make sure the trainer can accommodate the wheel size.
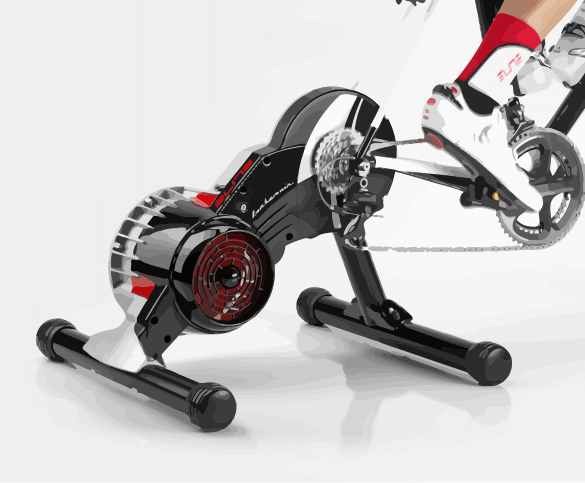 Direct Drive Bike Trainer
Direct Drive Trainers
This trainer also works with enclosed fluid, and offers progressive resistance. However, when you first see a direct drive Trainer it might take a few seconds to realize what it is. With this trainer you remove your back wheel and connect your bike frame directly onto the trainer. The trainer becomes the rear wheel. This trainer will require its own rear cassette and you will need to make sure it's compatible with your drivetrain. Although you will pay a hefty price for such a setup, it offers the most realistic feel and is the quietest so far. Other advantages include no tire and no rear cassette wear. Unfortunately, it does not fold so you'll need more room to house a direct drive trainer.
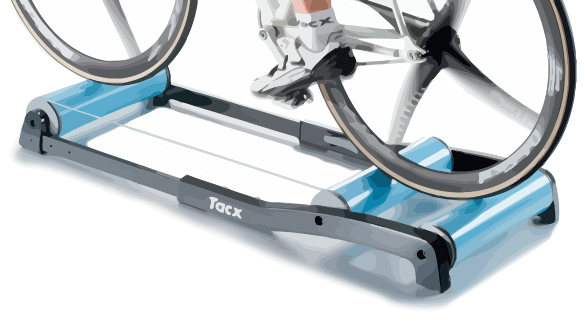 Bike Rollers
Bike Rollers
A totally different type of trainer are the rollers. They offer the most realistic feel. However, the tension is quite low and there is no way to adjust it except by changing your gears.
The most important consideration is that they require extremely good balance. This is both good and bad. It's bad in the sense that you have to concentrate the entire time, but good because it forces you to focus on your pedalling technique which can help you learn to spin at a high cadence. On another positive note, the tires wear out much less than the ‘A' trainers.
If you plan on using rollers, make sure you allow for a learning curve, and you will need support, at least on one side, for balancing. At least until you get the hang of it.
How To Ride On Rollers
Riding a roller is much harder than it looks. Don't let an self-proclaimed expert fool you into thinking it's easy. Expect a significant learning curve. Here are some ideas on how to start:
- Get children and pets out of the way, for their safety. Seriously. Don't be surprised if you fall off at first.
- Eliminate distractions and for sure don't try to watch TV. At least not at first.
- Check the manufacturer's recommendations for roller sizing/adjustment. Basically, the front roller should be just slightly in front of the front wheel axle.
- You might want to lower the seat to start with, because the rollers will put you higher up from the ground, which will create a problem for you when you want to get off.
- The ground on which the roller is place should be flat. No carpeting unless the carpet will not move at all.
- Find an area that has something you can lean on, ideally on both sides, like a hallway or a doorway.
- You will need something to step on in order to get over the bike.
- Once on the bike, clip in your feet, hold onto one wall, and start pedalling.
- Use an easy gear so you have a higher cadence, it's easier to balance this way.
- Do NOT stop pedalling. Faster is better for balancing.
- Balancing is done by your feet as you pedal. For example, if you push too hard with your right foot the bike will move to the left, possibly throwing you off balance. It's hard to explain this, but you will understand it as soon as you start riding.
- Focus your eyes on something a few meters away on the ground. Don't look down at the rollers.
- To get off: stop pedalling, grab the wall on one side, apply the back brakes and keep squeezing them until one foot is on the ground.
Pros and Cons of Using Turbo Trainers
Cons
- The biggest is probably boredom. Let's face it, there is nothing exciting about riding in one spot in your basement. Ten minutes on a trainer can seem like eternity, time for sure doesn't fly. So, what do you do? Put on the TV and watch a movie; get together with your riding buddies and ride together; create some competition with your riding buddies; maybe place the trainer near a large window or on the balcony; or put on a video of Tour de France.
- It will not prepare you for the variability of the outdoors. There are no surprise head winds and no hills. So once you go on the road for real it might take a while to get back into ‘real' riding.
- You might find yourself getting hotter indoors, so use fan.
- Interruptions: it's way too easy for family members to find you.
Pros
- Safety: There are no cars, no pedestrians, and no other riders that might get in your way.
- You can ride no matter what the weather.
- It is a very controlled environment, so you can focus on one specific aspect. For example, you may want to do a long ride at a specific intensity. Once you find the intensity you want, e.g. heart rate, then you can maintain that level as long as you want. Or, you may want to do interval training. Again, no traffic lights so you decide when the interval will end.
- Work on your weaknesses. For example, concentrate on the upstroke.
- Improve your pedalling efficiency. Since there are no distractions you can focus on what your legs are doing.
- Similar to pedalling efficiency, you can work on your cadence.
- Use new accessories and learn them without distractions. For example, you may start using power meters indoors and concentrate on power output.
- Excellent opportunity to use powercranks. In case you don't know, these are cranks that are totally independent of each other. Meaning, one foot can be totally still while the other foot is doing all the pedalling. With this type of training you can force each leg to power all the way through the stroke. Learning this on a trainer might be a bit easier than trying it for the first time on the road.
- One foot riding, if you don't have powercranks. Simply unclip one foot and ride with the other. Warning, this could be quite hazardous on rollers.
- You can make fine sizing and cleat adjustments much easier than when you're riding outdoors.
- If you are recovering from an injury riding on a trainer is much safer and easier on the body.
- Cleaning and maintenance will be reduced when riding outdoors.
- And last of all, you don't need to take a tool kit with you. 🙂

Leave a Reply