How to Choose and Use a Survival Knife
Table of Contents
- Assessing Your Needs
- Fixed-Blade or Folding?
- Blade Shape
- Serrated and Plain Edges
- Speciality Knives
- Knives You Don't Need
- Fine Points
- Carry It Safely
- Tools for Sharpening Knives
- Sharpening Methods
- Sharpening Serrated Blades
- Make It Handier
- Improvise a Knife
- Keep It Safe and Legal
- Holding the Knife
- Holding the Workpiece
- Basic Cutting Techniques
- Tree Work
- Notches and Holes
Assessing Your Needs
Choosing a knife could be one of the most important decisions you make before heading into the wilderness. The right knife can make almost everything you do easier, from preparing your next meal to helping yourself out of a life-threatening situation. In fact, choosing a knife might be two or three of the most important decisions you'll make, because no one knife can do everything well, and you may want to pack a backup or two.
What Can You Do With a Knife
With a bewildering variety of knives available, the place to start is understanding what kind of work your knife or knives might be called upon to do. The knife has a role to play in most of the primary tasks of wilderness survival.
Shelter
Protecting yourself from the elements is among the highest priorities. You might starve to death in three weeks, and die of dehydration in three days. But in the wrong weather without shelter, you could die of exposure in just three hours.
A really rugged knife, with a blade of 3″ (8cm) or more, is capable of cutting limbs and saplings and stripping bark to make an emergency shelter. If you're not equipped with yards of string or rope, a knife can be used to harvest certain plants and extract from them fibers from which to make the cordage required for shelter construction.
Fire
While fires can often be made and maintained with small twigs and dead stuff that is easily broken by hand, a rugged knife can make wood gathering and fire building much more efficient. Additionally, fire-making tools can be produced with knives.
Food
Food is plentiful in many wilderness environments. A small pocket knife is sufficient for most food-gathering tasks, although when hunting game, a larger fixed-blade knife tends to be more useful either in its own right, or to create other hunting tools. Certain traps and snares can be easily created with a small knife, while larger knives are handier for others. Some knives work better than others for skinning and dressing game. While any knife can be used to clean a fish, a fishing knife makes the job easier.
Water
Aside from its use for carving a digging stick, a knife will not be much help in securing drinking water.
Navigation and Transportation
A knife isn't much help in finding your way. A few knives have small magnetic compasses built in, but those are usually just novelties, rarely accurate enough for navigating over land. Should you need to cross a body of water, however, various types of watercraft can be built in the field with knives of different sizes and capabilities.
Signaling
A large, sturdy knife can be used to produce certain signaling devices that might enable you to signal for help over long distances— for example, from one mountain peak to another, or from the ground to a search plane overhead.
Medical Emergencies
A very small pocket knife will suffice for cutting bandages, making slings, and making small incisions.
The Unexpected
By its nature, finding yourself in a survival situation means that things have not gone according to plan, and certain of your expectations have been confounded. Maybe you need to fix a broken backpack, restitch a hiking boot, or remove a fishhook that's embedded in your calf muscle. The trusty Swiss Army Knife, or its steroidal younger cousin the multi-tool may provide just the tool for the job. You literally never know whether an awl, screwdriver, magnifying glass, wire cutter, pliers, scissors, or even a tiny LED flashlight might save the day. And there's no telling how many wilderness expeditions have been saved from disappointment, if not disaster, by the corkscrew on a Swiss Army Knife.
Fixed-Blade or Folding?
All knives fall into one of two categories: fixed-blade or folding. Fixed-blade knives tend to excel at certain tasks, while folders have clear advantages in other situations. Although you may form a clear preference, neither is “better,” so it's important to recognize the respective advantages of both kinds. Rather than choosing between them, it is highly desirable to bring at least one of each into the wilderness, using whichever is better suited to the task at hand.
Pros and Cons
Other things being equal, fixed-blade knives are sturdier, less prone to failure, and capable of performing heavier work. Also known as sheath knives, fixed-blade knives are quicker and easier to deploy, and safer to the extent that there is no hinge to fail, so they can't fold up inadvertently on your hand.
Folding knives are more compact, and are easier and safer to carry. Many have more than one blade or multiple tools, providing more functions than a fixed-blade knife. Although the two types overlap in size over most of their ranges, the largest outdoor knives tend to have fixed blades, and the smallest tend to be folders.
But “other things” are rarely equal. Well-made folding knives may be sturdier and more durable than bargain-priced sheath knives. Some folders have special features that make them quick and easy to deploy, while a poorly designed sheath can inhibit access to a fixed-blade knife. Some so-called “survival knives” of the fixed-blade variety have a number of built-in tools, while many folders offer only a single blade.
Main Choices
Your main survival knives should almost certainly be one or more of the following types: a standard sheath knife; a pocket knife; or a belt folder. (The latter two categories are both folding knives.) Consider packing in addition some of the more specialized types discussed later.
1. Sheath Knife
One of mankind's first and most basic tools, the fixed-blade knife remains among the most useful. It is so elemental that it scarcely requires description, and it is subject to endless refinements of form, material, and workmanship.
In essence, a fixed-blade knife is a blade with a handle attached for a secure and comfortable grip. Different blade shapes work better for different tasks — for example, carving or splitting wood, skinning and butchering game, scaling and filleting fish, cutting rope or tree limbs. Different handles may be more durable, more comfortable, or offer a better grip than others. The design of the tang — the part of the blade hidden within the handle — plays an important role in determining the knife's strength.
Every fixed-blade outdoors knife requires a sheath to protect the blade from damage and to enable the user to carry it safely.
2. Belt Folder
The belt folder is often the most basic version of the folding knife: a single blade that folds into a slot in the handle. Although this configuration shortens the knife when it's not in use and protects the edge from damage, the belt folder is too large (typically at least 3.5″, or 9cm long when folded) to carry comfortably in a trouser pocket. Instead, it is carried in a sheath on a belt. As with all folding knives, the tang is merely a stub, drilled to accept a hinge pin on which the blade pivots. Although a single blade is the most common, some belt folders are equipped with two. Tools other than cutting blades are less common.
3. Pocket Knife
Usually 3″ (8cm) or under in length when closed, the pocket knife can be as simple as a belt folder or, as in the well-known Swiss Army Knife, it can boast a multiplicity of blades and other tools ranging from saws, screwdrivers, and awls to LED flashlights, toothpicks, and computer flash drives. Obviously, some of these implements are more useful in wilderness survival situations than others.
Lockbacks
A lockback is a feature that may apply to any folding knife, in which the blade locks into position when open — usually automatically — to prevent the possibility of it accidentally closing on the user's hand. The blade must be unlocked in order to close the knife, and on many designs this is awkward to perform one-handed. Many belt folders are lockbacks. Some pocket knives have a lock on their largest blade, but rarely on smaller blades or other tools.
What About Multi-Tools?
Although often lumped in with knives, a multi-tool is in fact a different animal — a multi-purpose tool that almost always includes a knife blade along with several other implements. Most feature pliers/wire cutters as the primary tool, with some combination of flat and cross-head (Phillips) screwdrivers, wrenches, wire strippers, scissors, saws, files, can openers, and other tools being offered in a variety of models. The entire device typically folds into a compact steel rectangle, with the various tools hidden inside the handle. Because of the compromises inherent in such a design, multi-tools tend to be less convenient as knives, per se, than a conventional pocket knife. That said, they tend to be of high quality and offer a great deal of convenience in many situations.
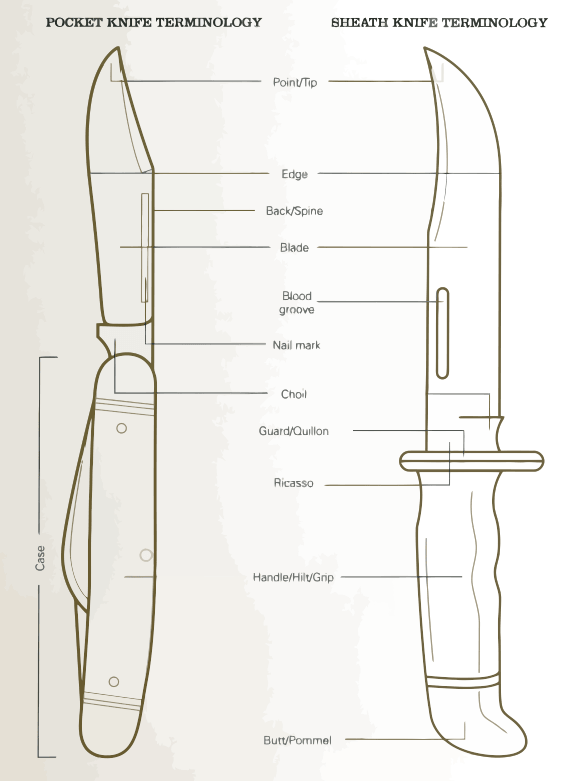
Blade Shape
A lot depends upon the shape of the blade. Blades differ in both profile and cross-section, and both influence how well a knife will work for different purposes. Along with the quality of the steel, the cross-section shape also limits how sharp the blade can be, and how well it will hold that edge. The shape of the blade will also affect your choice of sharpening equipment, your sharpening techniques, and how often you have to use them.
Profile or Pattern
The most obvious aspect of a blade's shape is its profile or pattern — its shape in silhouette. Out of the hundreds of different knife profiles in use around the world, just a few comprise logical options for general wilderness use. Almost every knife you find in an outdoor goods store will feature one of these patterns.
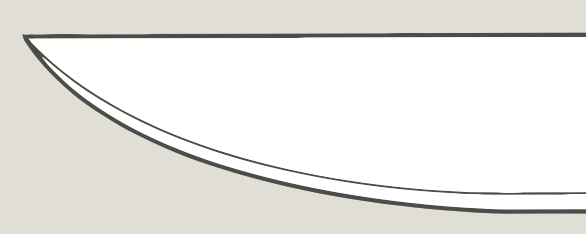
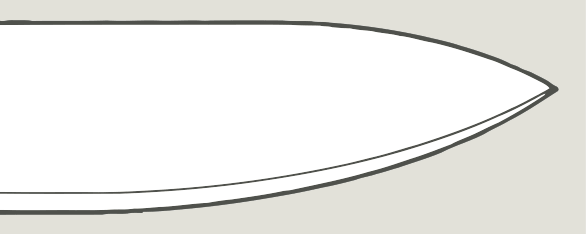
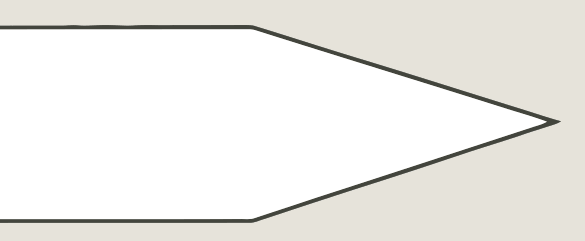
“Normal” Blade
The favorite of many outdoors experts, the “normal” blade has a straight spine and a curved edge. The point is fine enough to carve holes. No part of the blade is higher than the point, which thus clears the way for easy penetration of the entire blade when thrusting. The straight spine, if sufficiently robust, is good for pounding on with a baton (a club). The gently curved blade allows for good carving control while providing a longer cutting edge than a straight blade.
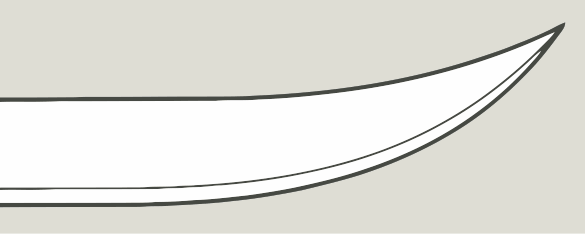
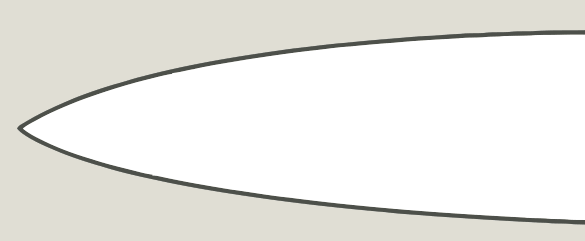
Curved, Trailing-Point Blade
A lightweight design, best for slicing and slashing. Narrow from edge to spine, it is not as strong as a “normal” blade. Although the narrow point is good for fine work, it is not so good for forceful thrusting, because the point has nothing directly behind it and may even be higher than the handle.
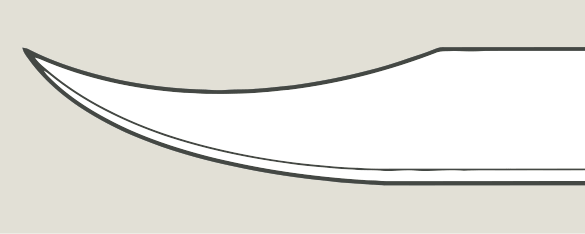
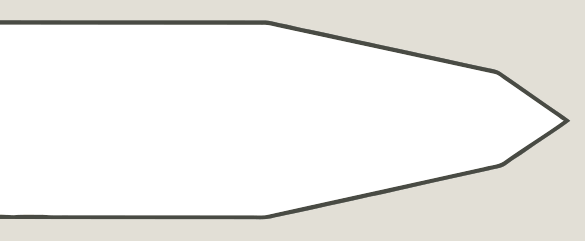
Clip-Point Blade
On this blade type, the tip end of the spine has been “clipped” away to reduce weight and produce a finer point. This allows it to perform like a curved, trailing-point blade toward the tip — good for slicing and skinning — and like a “normal” blade toward the handle — good for heavy work like chopping wood and cutting through bone joints. Although the narrow point may be delicate, it encourages a well-directed penetrating thrust because it is not higher than the handle, as on a curved, trailing-point blade. This is the pattern of the famous Bowie knife, one of the most popular styles of hunting knife.
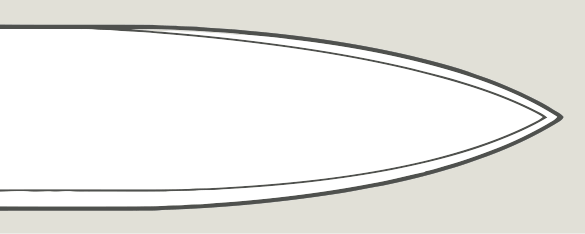
Drop-Point Blade
The curved edge offers the same benefits as a “normal” blade, making it a good carving knife. The point is coaxial with the handle but, because the spine curves down toward the point, this blade type does not penetrate well on a thrust.
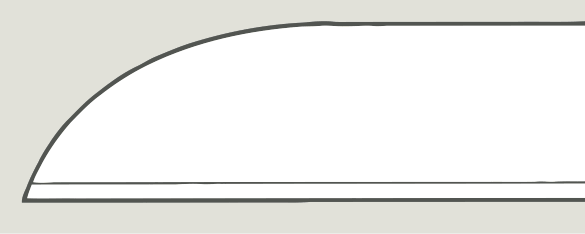
Sheepsfoot Blade
The only blade shown with a straight cutting edge, it has a spine that curves all the way down to the point. The knife can be held by the blade, providing excellent control for scraping or careful work with the fairly broad point. The point does not penetrate well, because the “front” of the blade is the broad spine.
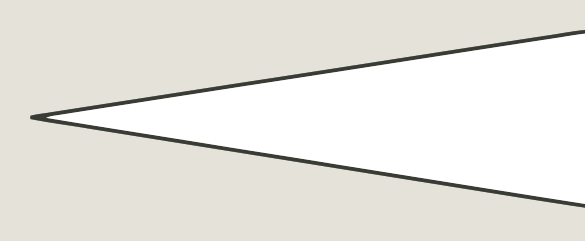
Spear-Point Blade
Although the profile is symmetrical, the blade may or may not be double-edged. Single-edged blades don't penetrate as well, although the height of the point relative to the handle is ideal for thrusting: the two are directly in line with each other. If two-edged, this is the best shape for a penetrating thrust.
Grind
A blade's cross-section is known as its grind, because during the manufacturing process, metal is removed from the blank by grinding to shape the blade. Almost all knives for outdoor use feature one of the following grinds.
Flat Grind
Both sides of the blade are flat from the edge up to the back. A flat-ground blade can take a very sharp edge, and it is easy to keep sharp in the short run. However, repeated sharpening may change the angle of the edge, and after a while it becomes quite a job to restore the proper angle, because a lot of metal must be removed.
Saber Grind
This is similar to the flat grind, but the ground section extends only partway up the blade, and the rest is parallel-sided. Capable of taking nearly as sharp an edge as a true flat-ground blade, it is easier to maintain over the long run because less metal needs to be removed to maintain the proper edge angle. This style is often called flat-ground.

Hollow Grind
Both sides of the edge are concave. This style can take the sharpest edge, because the two sides of the blade meet at the narrowest angle. This also means it is the most delicate edge, quickly dulled and easily chipped or rolled. Like the other grinds, it can be sharpened with a stone, but if the edge is badly damaged, a sharpening wheel is required to repair it — not something you're likely to be carrying.
Convex Grind
This is the opposite of the hollow grind, with the blade sides convex rather than concave. Also known as a slack-belt grind, because it is produced on an unsupported section of belt between the rollers of a belt grinder, this style offers a good combination of strength and sharpness. Although it cannot be made quite as keen as a hollow- or flat-ground blade, it can take an edge that is sharp enough for anything short of shaving and that will last longer in the field. Although long-term maintenance can be performed with a standard flat stone, it requires more skill than a saber-ground or compound-bevel blade.
Compound Bevel
Also known as a double bevel, the cutting edge takes a wider angle than the grind above it. This cannot be made as sharp as the other grinds, but the advantage is a tougher, more durable edge that will resist damage and keep its sharpness longer.
Double-Edge Blades
Leave double-edge blades to martial arts enthusiasts and carnival knife throwers. They have no place in the outdoors. They're more dangerous to the user than single-edge blades, and they're useless for batoning, a tremendously effective technique in which a wooden club is used to strike the spine of the knife to chop through tree limbs and even split small firewood.
Serrated and Plain Edges
Some outdoors people have a strong preference for serrated or toothed blades. Many more, it seems, are monogamously attached to a plain edge, and refuse to carry a serrated knife. More practical folk recognize that both have their advantages. Since you'll probably carry more than one knife into the wilderness, why not take at least one of each?l
Serrated Blades
Paramedics and rescue personnel tend to favor knives with serrated blades, because they cut through nylon webbing and other synthetic fibers more easily. This is great if you need to cut away a car's seat belt to free an accident victim, or maybe cut away the victim's clothing. Many river-rescue experts, who must cut through rope in situations where seconds count, also prefer serrated edges. In general, serrated edges seem to work better on tough, fibrous materials.
Some self-defense experts recommend a serrated edge because it cuts flesh more easily, a principle that would apply equally to wild animals as to people.
But let's keep a sense of proportion here. The chances of having to use a knife to defend yourself against either animals or people in the wilderness are vanishingly small, and if killing is really on the agenda, you'll do better using the point of your knife rather than its edge.
Plain Blades
A key advantage of a plain-edge blade is its ease of sharpening. Any sharp knife is better than any dull knife, no matter whether its edge is plain or serrated. A plain edge can be kept sharp with just a few minutes of work, and it requires no special equipment — indeed, you can sharpen a plain-edge blade with almost any rock you pick up in the wild. A serrated blade, in contrast, requires a special tool, and a lot more time and skill. (On the other hand, serrated blades tend to remain sharp longer.) While a plain edge may be somewhat interior to a serrated one for cutting tough fibers, a sharp plain blade will still cut through rope and webbing and do the job adequately in 99 cases out of 100. It will also do a far better job at many other tasks, such as carving, chopping, and scraping. Where good control and a clean cut are desired, no serrated blade can equal the performance of a sharp plain edge.
Combination Blades
Since both types of edges have their advantages, many knife makers offer models with blades that combine the two, with a serrated section — almost always closer to the handle — taking up anywhere from a quarter to half of the blade's length, and the remainder being plain. Some users — including some wilderness survival experts — prefer this kind of combination edge. Others feel that, instead of combining the capabilities of the different edges, this hybrid style reduces each by the proportion of the blade length given over to the other type. So a 6″ (15cm) blade that's half-serrated is effectively just two 3″ (7.5cm) blades, not necessarily in the ideal configuration. Some argue that the plain-edge section should be the one closer to the handle, allowing better control for fine carving tasks.
However, like any plain or serrated edge, any well-made knife with a combination edge has its virtues and its shortcomings, and it's the virtues that will help you survive in the wilderness.
Speciality Knives
After you've chosen your primary survival knife or knives, consider adding these to your arsenal for greater convenience or additional functionality.
Fishing Knife
Almost every angler keeps a spare pocket knife in his tackle box, but most work gets done with a special-purpose fishing knife. The long, flexible, very narrow blade is made for the delicate work of cleaning (gutting) and filleting, although it may be too delicate to cut effectively through the spinal column of a large fish. Some folding models have a second blade for scaling. This has rounded, dull teeth to work under the scales and lever them out of the skin without cutting the skin itself. Desirable features include handle material that allows you to retain a firm grip even when your hands are coated with blood and slime, and a wrist lanyard to prevent the knife's loss into the water should it slip out of your hand in spite of the handle's “grippiness.”
Machetes and Bush Knives
A machete typically has a blade at least 12″ (30cm) long, and is used with a swinging or chopping stroke. A bush knife is a machete with a brush hook extending from the spine of the blade. Both are too large to be carried casually, but are worth considering if you seriously anticipate having to cut your way through dense brush. Either can serve as a light-duty axe. Some might argue that a machete isn't really a knife, but survival doesn't care much about semantics.
Skinner
What makes a good skinning knife is a matter of opinion and what you're used to. Knives sold as skinners differ so greatly from one another that it's impossible to make generalizations. Some have long narrow blades; some are short, broad, and leaf-shaped; some have the “normal” profile; and others are classic clip-point Bowies. There are T-handled versions; versions with small-radius concave blade edges called “gut hooks” designed to zip through skin or sever tendons while avoiding internal organs; versions with straight edges, and versions with edges so curved that they describe a quarter-circle. Each type has its champions and its detractors. The only criterion that really matters is what works for you, and the only way to find that out is to try different styles until you-find one you're comfortable with.
River, Rescue, and Diving Knives
Rescue professionals, scuba divers, and Whitewater paddlers demand a few common features of their knives. They often have to cut through rope or tough webbing material, and often have to do it quickly and in close proximity to human flesh. Consequently, knives for all three groups tend to feature serrated edges (good for cutting rope), and blunt tips (to avoid accidental stabbings). Folding rescue knives and sheaths for
fixed-blade rescue knives usually have clips designed to keep them handy and secure outside of a pocket. The sheaths on some fixed-blade diving and river knives have a locking mechanism that holds the knife securely but allows it to be released quickly with one hand.
Knives You Don't Need
With so many worthwhile types of knives to consider carrying into the wilderness, it makes little sense to burden yourself with a knife of limited practicality. Some may find these knives enticing, but don't waste your time with…
Throwing Knives
Throwing knives have fixed, double-edge blades, and usually no handle grips — just a bare tang. They are made for one thing only: throwing. In the wilderness, the only plausible reason to throw a knife is to hunt game. And since hunting with a thrown knife is legal almost nowhere, the only reason to bring one (or more — they're often sold in sets of three) is because you expect to find yourself in a survival situation where you will be forced to hunt for your food. And if you expect to find yourself in this situation, and you still go, then there seems to be something seriously wrong with your thought processes. You'll never kill a rabbit with a thrown knife anyway, but you very well might lose it, which is probably the best thing to do with your silly throwing knife.
Switchblades, “Authomatics,” Flick, and Gravity Knives
These are all folding knives with quick-opening mechanisms. Switchblades and “automatics” are spring-loaded — you push a button or slide a thumb lever, and the blade pops out. Flick and gravity knives have a low-friction hinge and are configured so that, with a rapid wrist motion, the blade will swing out and usually lock with a lockback mechanism.
All four styles have been given the aura of menace through their appearance in movies and on television, but none are as durable and reliable as a well-made conventional folding knife. Their real purpose is to make the owner feel that he's a dangerous type, not to be messed with.
Balisongs
Also known as butterfly knives or fan knives, balisongs are folding knives popular in Indonesia and the Philippines. Having either single or double edges, they feature a two-part handle that hinges around the blade from opposite sides. It can be great fun to learn how to open and close a balisong one-handed, but the loose hinges that make one-handed opening possible also ensure that the blade will be wobbly and weak when deployed.
Survival Knives
There are survival knives and “survival knives.” Almost any well-made knife — Folding or fixed, plain-edge or serrated — can be credibly marketed as a survival knife, for almost any such knife will indeed help ensure your survival in the wilderness. But then there-are faux survival knives that are designed mainly to look impressive in an action-movie-hero kind of way — knives with oversize (but often tinder-strength) blades, hollow (read “weak”) handles containing miniature mockeries of survival kits, blade guards with toy “grappling hook” extensions, exaggerated and useless (but menacing-looking) teeth cut into the spine and, often, a tiny magnetic compass where the pommel should be, preventing the use of the butt as a hammer. They always have a feature called a blood groove, because that sounds really dangerous. Of course, the manufacturers of these “survival knives” don't put quotes around them, and they insist that theirs is the biggest, baddest, macho-est knife around. But you'll never see a skilled outdoorsperson carrying one of these ostentatious monstrosities.
Display and Novelty Knives
Some knives are intended primarily as aesthetic objects, featuring elaborate blade shapes and handles decorated with precious metals and semi-precious stones, or laser-etched images commemorating some notable individual, event, or movie character. Some of these display knives consciously mimic the improbable edge weapons wielded by characters on the covers of fantasy novels. While such knives might be things of beauty or interest, they are not designed to give good service under rugged conditions. Leave them at home in a glass display case.
Boot Knives
Boot knives are intended to be carried in a sheath inside the top of a tall boot, while neck knives are designed to be hung by a lanyard around the neck. Both types may be viable survival tools, but there's little reason to carry them in such awkward locations.
Fine Points
If all important knife characteristics were as visible as basic configuration (fixed versus folding), pattern and grind, and so on, then your choice of a knife would be as simple as looking at a photograph. But there are a few more important attributes to consider.
Balance and Feel
Perhaps a knife's most important quality is how it feels when you use it. This is mostly subjective, but if the knife doesn't feel right, then you may never feel quite safe using it, and it simply won't be very effective under those circumstances.
Consider the material, texture, and shape of the grip. A “tacky” rubber handle may help you keep your grip when your hands are wet or slippery. But you might find it uncomfortably sticky, and might prefer a hardwood handle with deep diamond-shaped cross-checking to ensure a solid grip. Some experts recommend that sheath knife handles have oval cross-sections, but a rectangular cross-section with rounded corners might fit your hand better. Unfortunately, just holding it in the store might not give you as good a sense for a knife's feel as spending an hour cutting tree limbs with it.
The knife's front-to-back balance influences both feel and function. A blade-heavy design, whose center of balance is forward of the handle, is better for chopping, while a light blade is easier to control for fine carving and whittling.
Steel
It's rare that manufacturers describe the metallurgy of their blades in any detail — which is just as well, since it's a complex subject in which a lot of scientific jargon could easily be used to confuse the consumer. Most manufacturers do, though, identify a blade as either stainless or carbon (or high carbon) steel, and these are worth paying attention to.
A very small amount of carbon hardens steel. A certain amount of hardness is desirable, since hard steels hold an edge better. On the other hand, hard steels are harder to sharpen in the first place. Anything over 0.5% carbon is considered a “high carbon” steel. If you're willing to take out the stone on a moment's notice to touch up your knife, then a softer steel is for you. If you'd rather sharpen less often, you need a harder steel that holds the edge longer — but be prepared to spend more time creating that edge. The main drawback of carbon steel is its poor corrosion resistance.
Stainless steel contains at least 13% chromium, which improves the steel's resistance to both corrosion and wear. Most stainless steel is difficult to make and keep sharp, but some of the more expensive stainless steels avoid these drawbacks.
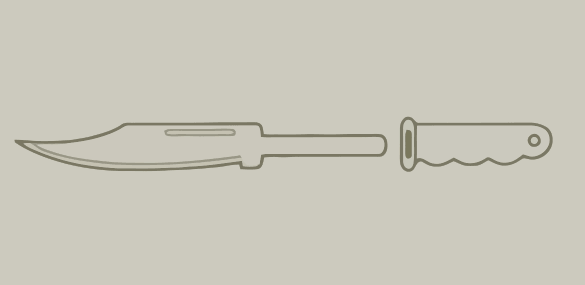
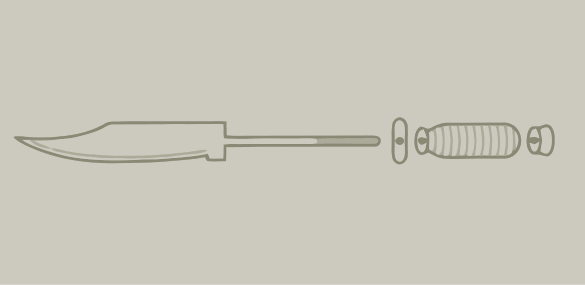
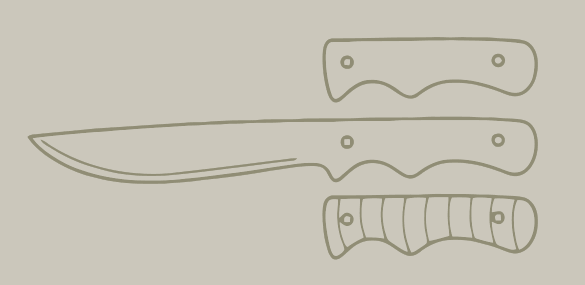
The Tang
The tang is the part of the blade buried inside the handle of a fixed-blade knife.
A full tang is one that extends the whole length of the handle and from top to bottom — in other words, you can see the tang between the handle pieces all the way around.
Partial tangs come in three common varieties:
- A half tang (top-right) extends to the full height of the handle, but not to its whole length.
- A push tang (second from top at right) or stub tang extends only partway into the handle.
- A rat-tail tang (second from bottom at right) is like a push tang with a rod welded on the end that threads into a metal pommel at the butt.
- A full tang (bottom-right) is unquestionably the strongest design, and the best suited to being beaten on with a baton. But a full tang is also the heaviest design, and you may not like the feel of the steel against your hand. Half, push, and rat-tail tangs are lighter and provide cushioning all the way around.
Quality
Examine the knife carefully for signs of quality. Are all surfaces smooth and well-finished? Are the handle side-pieces secured firmly and the rivets fitted cleanly?
If it's a folding knife: do the hinges work smoothly? Is there any side-to-side play or wobble between the blade and the handle? Is the locking mechanism reliable, secure, and easy to operate?
Avoid bells and whistles. At any given price, a knife with fewer “features” will probably have better materials and workmanship. Keep your ego in check. A bigger knife may not be what you need. Consider your likely requirements, and go for the best quality you're willing to afford.
Mors Kochanski's Knife Advice
Mors Kochanski is renowned as a survival expert, and his opinions are worthy of attention. In Bushcraft: Outdoor Skills and Wilderness Survival, he describes his sheath knife preferences:
- the blade should have a single edge
- the edge should be curved from the handle to the tip, with no straight section
- the blade should be carbon steel, 1/10″ (2-2.5 mm) thick and 2″ (20-25 mm) tall
- the back of the blade should be in line with the top of the handle
- the handle should be oval in cross-section
- there should be no upper blade guard
- the tang should be full
- there should be a strong pommel
- the knife should be strong enough to bear your weight if you drive it 1.5″ (4 cm) into a tree with the flat surface of the blade horizontal
Carry It Safely
Unlike kitchen knives, most of which lead a sedentary life, outdoor knives are expected to move around. And while the blade of the stay-at-home kitchen knife is usually left exposed, the blade of an outdoor knife must be protected when being carried, for both the sake of its edge and of its owner's health. So fundamental is this consideration that the basic knife types are known by how they are carried: sheath knife, pocket knife, and belt folder.
Belt or Pocket Clips
Some folding knives that are small enough to carry in your pocket are equipped with a clip, permitting them to be carried more conveniently within easy reach at the very top of a trouser pocket, or outside the pocket altogether. While fastening it to your belt is an obvious option, think about how you'll be dressed and equipped as you move through the wilderness and consider clipping it instead to a piece of outerwear or equipment such as a shoulder strap or lashing point on your backpack, or a lash tab on a personal flotation device.
Don't place too much trust on the clip until you've tested it, because some clips are more secure than others. Depending upon the clip, your knife might be bumped free from its attachment, and you may never notice that it's gone until too late.
Where's Your Spare?
If you enter the wilderness with more than one knife, make sure to keep them separately. If you lose one, you don't want to lose both. Even if you've got one on your belt and one in your pocket, consider packing at least one more.
Lanyards
A lanyard hole is a feature found on many knives, and a good one to make use of. Thread any strong cord or a leather thong through the hole. If you make this just long enough to slip around your wrist, it will prevent you from dropping the knife on your foot or into the lake, should it slip from your hand. Or you might make the lanyard long enough so that it can remain tied to a belt loop while you use the knife.
Sheaths
Almost all fixed-blade knives are sold with sheaths, for there is no safe way to carry them without one. When purchasing a new knife, consider the sheath as part of the purchase. A sheath of poor quality or design doesn't necessarily mean that the knife itself is of poor quality or design, but it will interfere with your use of the knife.
A well-designed sheath must protect the blade, hold the knife securely, and release it quickly and easily. A sheath that covers only the blade usually requires a snap-close strap near the top to secure the handle. If you find snapping and unsnapping the strap inconvenient, you might prefer a full-depth sheath that swallows almost the whole length of the knife, leaving only the pommel or lanyard exposed to grab hold of.
Leather is an excellent sheath material since it's easy on the blade, durable, and provides good protection, but it requires some care to prevent it from drying out and cracking. Ballistic nylon cloth requires no maintenance, but it's more prone to becoming cut up over time by the very blade it's meant to protect. Most hard plastic sheaths suffer neither of these drawbacks, although they are arguably the least attractive option.
Sheath Lanyard
Fixed-blade knives with long blades of 7″ (18cm) or more can be awkward appendages when carried in a belt sheath — especially when you sit down and your thigh moves to a horizontal position while the sheath persists in remaining vertical. A lanyard or strap near the bottom of the sheath is meant to be fastened around your thigh, keeping the sheath and your thigh heading in the same direction. Not everyone finds it comfortable to walk with such an attachment, however.
Tools for Sharpening Knives
Many knives need sharpening right out of the box, and all knives need to be sharpened regularly after every few hours of use. Many different tools for sharpening are available, and most will do a good job if used correctly. Choose the method that works best for you.
1. Oil Stones
Oil stones may be either natural stones or man-made from abrasives like aluminum oxide or silicon carbide. The natural versions — often known as Arkansas stones — tend to be more expensive. All types are available in various grits, with lower numbers being coarser and higher ones finer.
Coarse stones remove material more quickly, but leave a rougher edge. Unless a blade has been badly abused, you may not need a stone with a grit as coarse as 100. Most of your sharpening will be done with a medium-grit stone of 180-280, followed by a fine stone of 500-700. (These are U.S. standards. Comparable stones from Japanese manufacturers use a different measuring standard with consistently higher numbers.)
Oil stones use oil to lubricate the surface and suspend the microscopic metal-grinding debris so that the pores in the abrasive surface do not become clogged. Place several drops of light machine oil on an oil stone before use. When sharpening, pause occasionally to wipe it with a rag to remove the sludge, then apply a few more drops of oil.
2. Water Stones
Water stones, which use water instead of oil as a lubricant, may also be either natural or synthetic. They must be soaked in water for several minutes before use. Less expensive than oil stones, they cut faster, but also wear faster and so need more maintenance.
Because of their lubricants, both water stones and oil stones can be somewhat messy to use.
3. Ceramic Stones
Ceramic stones are more expensive and more durable than oil stones. They are used dry but must be cleaned frequently during use. Woodcarvers like ceramic stones because they can produce extremely sharp edges, but this may be overkill for an outdoors knife that will see rough use.
4. Diamond Stones
Diamond stones are actually steel plates with microscopic diamond crystals bonded to the surface. Unsurprisingly, they are the most expensive type of stone, and the most durable. A few drops of water on the surface will be enough to float the metal filings, making cleanup quick and easy. At any given grit, they cut faster than other stones.
Sharpening Methods
Read five articles on sharpening knives, and you'll likely learn five techniques. The method described here is one of many good approaches, and it's fairly easy to perform. Bear in mind that an outdoor knife does not need — and should not have — the ultimate in sharpness. The ruggedness of the edge is also an important quality.
Sharpening In Stages
Depending upon the condition of the knife and how sharp you want to make it, the sharpening process may require two, three, four, or even five stages.
If the blade is very dull or nicked, start with a coarse stone. To restore a good edge after normal use, start with a medium stone, then proceed to a fine stone. If you want the finest edge possible, you may go one step further and strop the blade with a leather strap or synthetic strop.
After a blade has been sharpened hundreds of times, it becomes shorter (measuring from the edge to the spine) and the edge becomes thicker, making it impossible to re-establish a narrow edge angle. When this occurs, you need to grind the sides flat to thin the blade before working on the edge angle.
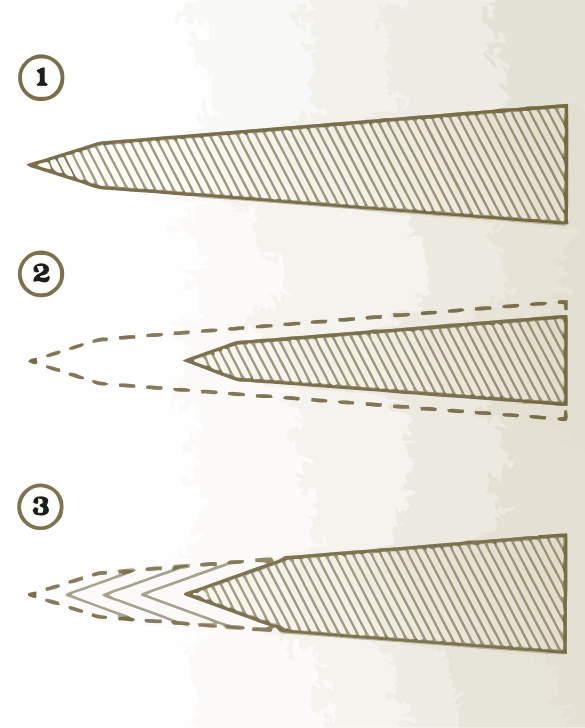
Long-Term Sharpening
- A new flat-ground blade, properly sharpened.
- RIGHT: Before honing, grind the sides thinner to maintain the proper angle.
- WRONG: After sharpening only the edge too many times, it becomes wider and the proper cutting angle cannot be maintained.
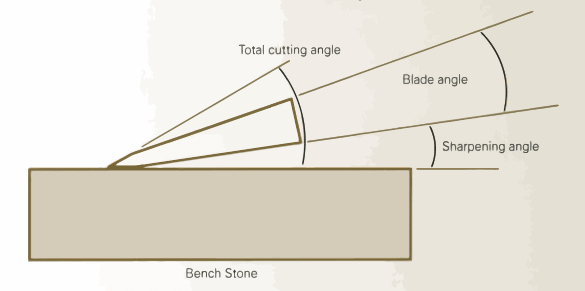
Edge Angles
The smaller a blade's angle, the sharper it can be. Woodcarvers, who require precision above all, use a sharpening angle of just 8-10°. This promotes very accurate, clean cuts, but the edge is too fragile for outdoor use. It would be easily chipped, dulled, or “turned” if used for chopping or splitting wood, or making big, rough cuts. For our needs, a sharpening angle of 13-16° is more appropriate, producing an edge angle of 26-32°.
A Matter of Opinion
There are different opinions regarding almost every step of the sharpening process, starting with the choice of tools. Some insist that only an oil stone (or a ceramic stone, or whatever) can do the best job. Some claim that the honing stroke must be toward the edge, and others claim just as adamantly that the edge must be trailed across the stone. Straight strokes versus circular motions; alternating sides on every stroke versus working one side completely before switching: if you listen to enough advice, you'll never get that knife sharp. Choose any method that appeals to you and learn to do it well. Then try another method if you wish and decide which one you prefer.
Flattening
There's almost no skill required to thin or flatten the blade — just persistence. Lay the blade flat against a coarse stone and stroke in a circular motion, gradually moving along the whole length of the blade to thin it consistently. Wipe or rinse off the grinding sludge periodically and reapply lubricant as required. After several dozen strokes, flip the knife over and do the other side. Then do the same with a medium stone, and finish with a fine stone to remove the scratches.
Honing
Determine whether you need to begin with a coarse or medium stone. Hold the blade flat against the stone, then tip it on its edge so that the spine is about its own thickness above the stone. This will produce a sharpening angle between 13 and 16° on most blades. If you want to achieve a more precise result, use a protractor.
Maintaining that angle, stroke the blade across the stone a dozen times or so, then flip it over and do the other side. If the edge is badly nicked or dented, you may need to do this several times, concentrating on the bad areas, then feathering these heavily ground areas in both directions to smooth out the line of the edge. You may stroke either toward or away from the edge, or back-and-forth. You may concentrate on one area of the blade before moving on to the next, or draw the blade lengthwise across the stone as you stroke forward and back, so that the entire length of the blade gets equal treatment on every stroke. Pressure should be moderate — just enough so that you can feel the stone abrading the steel.
When you're done with the coarse or medium stone, move on to the fine stone and repeat the process. Just five or ten strokes may suffice for each side.
Sharpening in the Field
A good bench-quality sharpening stone is too big and heavy to carry into the field, but pocket-size stones are available. An excellent option for portability is the kind of diamond sharpener shaped like a file.
What if you're in the wilderness with no sharpening equipment? Well, you never are! Almost any stone with a fairly regular surface can be used to sharpen a knife. With just a little searching, you may be able to find 100 percent natural stones in coarse, medium, and fine.
It is safer to draw the knife across a hand-held stone than vice versa. Even so, make sure you hold the stone so as not to endanger your fingers, and stroke away from your torso and other arm.
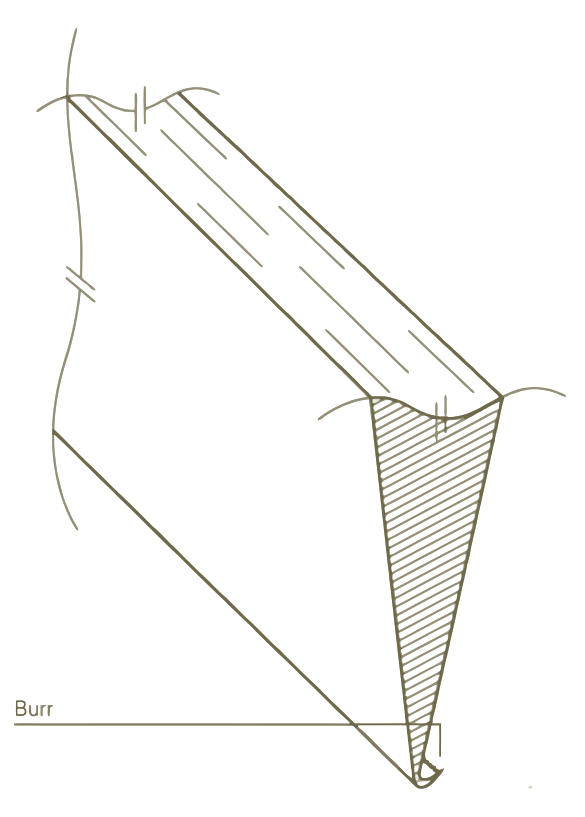
Stropping
Check the edge by dragging your thumb across it from the spine toward the edge. Caution: do NOT run your thumb along the edge! Your use of the fine stone may have left the edge perfectly clean. But if you feel a burr, this must be removed, either by further honing on the fine stone, or by stropping.
You may use a leather strap, an old belt, or a piece of tough cotton fabric fastened securely to a thin board. Charge the strop with stropping powder or household abrasive cleanser. Drag the blade across the strop a dozen times on each side, trailing the edge. Check for the burr and repeat as needed.
Testing for Sharpness
How do you know when the blade is sharp enough? There are several tests:
- Take a thin shaving across the end grain of a pine board. The cut should be smooth, with no torn fibers.
- Try slicing a piece of expanded polystyrene (e.g., Styrofoam). Do the cells slice cleanly, or do they compress and bunch up?
- Can you slice through the edge of a piece of writing paper?
- A method not to use: shaving your arm or your neck.
Sharpening Serrated Blades
Serrations increase the effective length of a blade, so that a 3″ (8cm) blade may have 4-5″ (10-13cm) of cutting edge. Because of this, serrated blades retain their sharpness longer than plain blades of comparable length. That's a good thing, since they're more difficult to sharpen.
Serration Shape
Serrations are generally ground on only one side of the blade and are often of different sizes and shapes. An edge may have two or three small-radius serrations between every large-radius one, and the bevel angles of the different-size serrations may differ as well. All of this has implications for sharpening techniques.
Sharpening Tools
The best tool for sharpening a serrated knife is a set of round, tapered sharpening rods. Available in a variety of grits, these are made from « abrasive ceramic, or steel with minute diamond grains embedded in the surface. Because of their conical shape, they can be used for serrations of different radii.
If your knife has a single serration size, a cylindrical rod makes sense, because you can use the entire length of the tool without fear of altering the size of the serration. Make sure to get the right size tool by bringing your knife into the store and comparing the tool's diameter against the serrations.
Setup
If you're right-handed, and the serrations are ground on the left side of the blade, hold the sharpener in your right hand and the knife in your left. Although this can be done freehand, it's easier and more accurate to rest the knife on a workbench or other solid object, with the edge facing away from you, and the blade tilted so that the bevel of the serrations is horizontal.
If you're left-handed, or if the serrations are ground on the right side of the blade, you might find it easier to make the tool the stationary object, and use your dominant hand to stroke the knife against it. In that case, place the handle end of the sharpening tool on the bench, and rest the opposite end against your chest, holding it steady with your off hand.
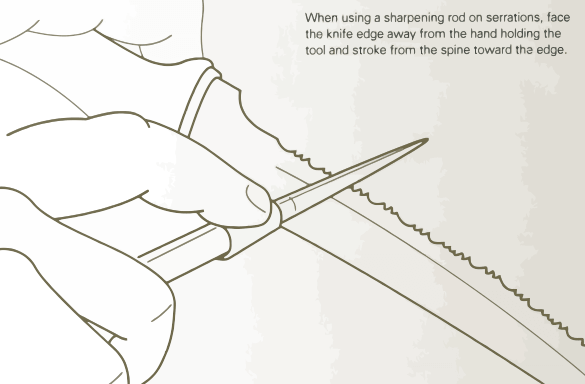
Technique
Some people can stroke the tool against the blade in both directions while keeping the angles steady. If you find this difficult, make your strokes all in one direction, from the back of the blade toward the edge. This causes the burr to form on the non-serrated side of the blade, where it is easier to remove. It also keeps the edge facing away from the off hand, so that an errant stroke doesn't result in a laceration. If you do stroke in both directions, be extra careful of the edge.
Alternate Techniques
Here are some more tips for sharpening a serrated knife:
- Set up a 2×4 or other piece of lumber as a solid workbench. You want something narrow enough to reach across easily. Use clamps to hold the blade flat against the wood, with the serrated side up and the edge facing away from you and hanging over the edge. This enables you to use both hands to control the sharpening tool. Relocate the clamps when necessary.
- Instead of an expensive diamond-encrusted sharpening tool, cut a sheet of 300- or 600-grit wet-or-dry sandpaper into narrow strips and wrap them around a short section of dowel or metal rod that matches the diameter of the serration. A bicycle spoke is about right for some small-radius serrations.
With a black felt-tip pen, completely ink over the bevels on all the serrations before you begin sharpening. It will take just a stroke or two with the sharpening tool to see whether you're working at the right angle. Use the trick only with wet-dry sandpaper: you don't want to transfer ink to ceramic or diamond/steel tools.
For general sharpening, start with a medium- or fine-grit rod. In cases of deferred maintenance, you may need to start with the coarse one. Find the section along the length of the rod that fits snugly into the serration, and take gentle strokes. Keep the strokes short so that you don't change the radius of the serration.
After a stroke or two, look carefully at the serration. A consistent pattern of scratches will indicate that you're maintaining the existing bevel angle. If the serration is scratched only at the top or bottom, adjust your angle of attack.
After five or ten strokes, feel the back of the blade to check whether a burr has developed. If not, take five or ten more strokes and check again.
Once a burr has formed, move along to the next serration. If the blade has serrations of different sizes, do all the serrations of one size before moving on to the other size or sizes.
After you've done all the serrations, flip the knife over and remove the burrs. On anything but a hollow-ground blade, you can use either the same sharpening rod, or a fine stone, or a strop. On a hollow-ground blade, you must use a strop, because a stone will remove the tips of the teeth. Finish up by stropping alternately on both sides, trailing the edge as you drag the blade across the leather.
Make It Handier
As well-designed as many knives are, many can still be improved with some simple modifications. If you experiment, make sure to test your modifications thoroughly before heading into the wilderness, where your safety may depend upon them.
Improve the Grip
No part of a knife is more subjective than the grip. Objectively, it just needs not to fall apart. But what's comfortable and what feels secure are matters of opinion, so feel free to make some changes.
A smooth wood or hard plastic grip can be modified with carefully incised scoring to improve your hold on it. Unless you're an expert carver, this is best done with a fine, sharp file. In the case of a wood grip, you'll want to treat the handle with oil or varnish again to protect the wood after you've scored it. Warning: some plastic grips may crumble or chip if you score their surface deeply.
On a sheath knife, a “grippier” grip can also be achieved by applying a non-slip material to the handle. A section of inner tube from a low-profile bicycle tire can be slipped over the handle, and may be secure without any adhesive. Of course, this will increase the thickness of the handle, which may or may not be desirable.
Another way to make the handle thicker is to wrap it with duct tape. While some will hate the way this feels or looks, others won't mind, and you will always have a few feet of this invaluable survival material ready to hand.
Add a Lanyard Hole
A lanyard helps protect your knife from loss, and a wrist lanyard can help increase the speed of the knife blade when making swinging strokes, for more effective wood chopping. If your knife has no lanyard hole, add one if possible.
First determine if the pommel can be drilled. This is rarely a problem on a sheath knife with a full tang or a push tang, unless a rivet is in the way. A rat-tail tang, however, may have a threaded rod right where you'd like to place the lanyard hole, and you should not attempt to drill through this or the knife will fall apart. Many folding knives cannot be drilled without compromising their structure or function.
Don't attempt to freehand the hole. Drilling requires a drill press with a high-speed bit and a drill press vice to hold the knife. After drilling, chamfer the hole on both sides.
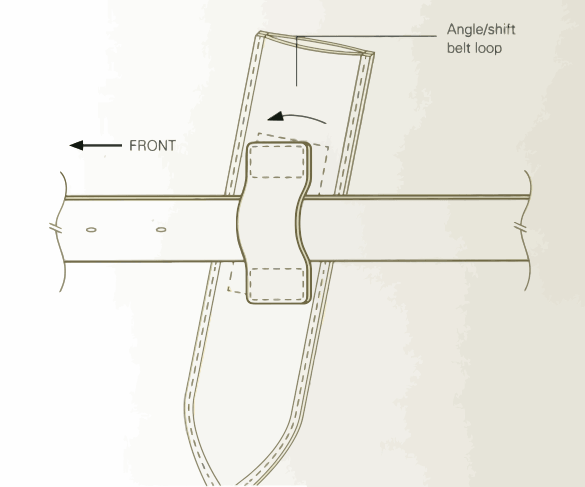
Angling the Sheath
If you find that the sheath of your long knife gets in the way and you don't want to use a sheath lanyard, you can modify the belt loop as shown below, resewing or gluing material so that the knife hangs at a forward-facing angle.
To improve comfort when sitting with a knife on your belt, modify the belt loop so that the bottom end of the sheath points forward.
Improve the Sheath
The sheath can be a handy and logical place to attach a sharpening stone. How you go about it will depend upon the material of the sheath. A small pocket, just large enough to hold a miniature stone, can be sewn onto the front of a fabric or leather sheath. With a hard plastic sheath, fastening the stone with epoxy is often a better approach, although epoxy may not stick to all types of plastic.
Improvise a Knife
What if you lose your knife? All may not be lost if you can improvise one from materials in your environment.
A Knife, or a Blade?
First, get rid of your preconception of what a knife should look like, and concentrate on essentials. Your “knife” might not require a handle, and the blade need not necessarily be long and thin. If the job at hand requires puncturing rather than slicing, it might not even require an edge: a simple point might suffice.
Flint Knapping
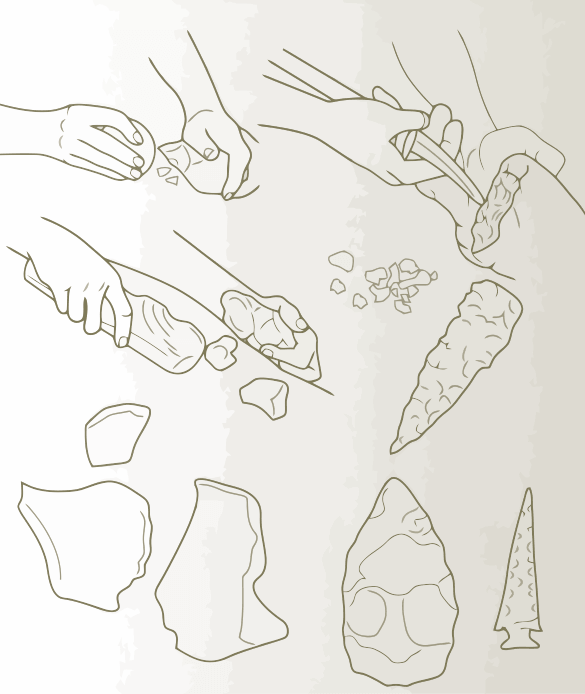
Many stones can be crafted into usable knife blades, but hard, fine-grained stones like flint, chert, and obsidian can be crafted into fine thin blades with extremely sharp edges.
If the stone you've chosen is large, use another stone that fits comfortably in your hand to use as a hammer, and strike the workpiece on its “end grain” to break off large flakes. If your workpiece is small enough to hold in one or both hands, find another rock to use as a stationary anvil, and strike the workpiece against it. This is a crude process, and you will probably have to break off dozens of pieces before you get one that suits your needs.
Holding your workpiece in one hand, strike the edge carefully with a small hammer stone to refine the edge. If you will use the stone as a knife without a handle, you might also work on the back edge to remove any sharp edges that will interfere with your grip. To make the most refined edge, carefully remove small flakes from the edge by “pressure flaking” rather than striking it, using a blunt-pointed piece of hardwood or antler as a tool.
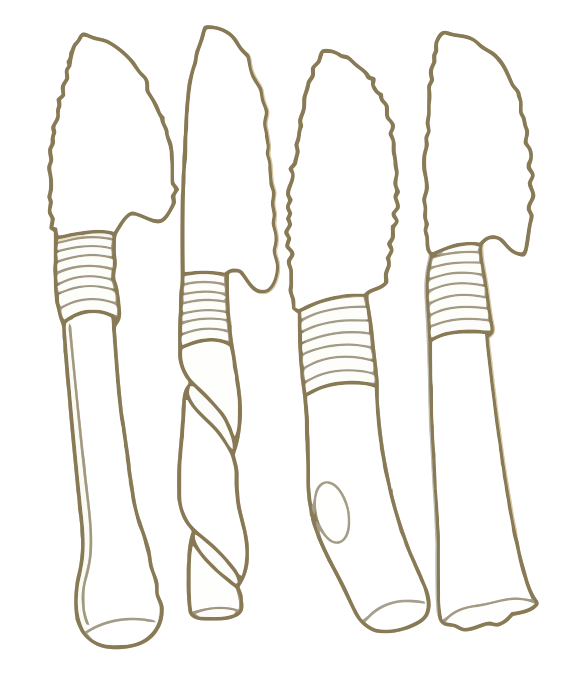
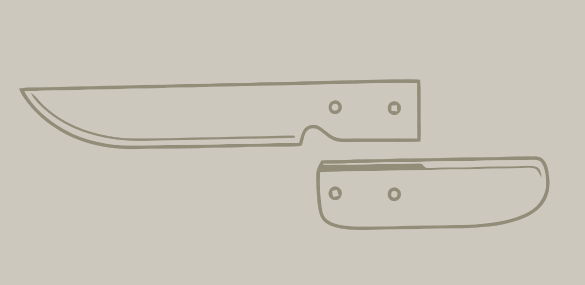
Hafting the Knife
If your stone blade is long enough to have a tang, a handle can be added (see right). A small stick, split in half, will make a nicely rounded handle. This can be lashed in place with rawhide, string, wire, or strips of bark. For that matter, the stick may not be needed if sufficient wraps of binding material are placed around the tang.
Making a Hoko Knife
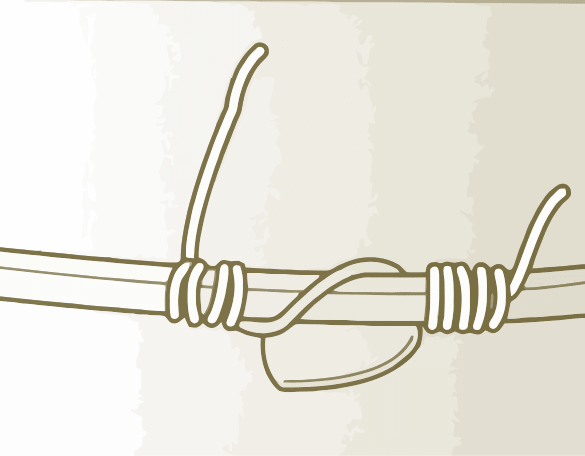
At an archaeological site on the Hoko River on the Strait of Juan de Fuca in Washington state, in a village that had been covered by a mudslide some 2,500 years ago, archaeologists found elegant little slicing knives that are easy to reproduce. Only a small stone flake is required, but it must be thin and very sharp. A green stick 7-9″ (18-23cm) long serves as the handle. Willow works well for both the handle and the binding material.
Strip bark from the stick in long thin strips. Tie a strip around the stick about 4′ (10cm) from one end, then split the stick lengthwise, using a sharp sliver of stone as a temporary blade. The bark tie will prevent the split from running too far. Next, push your designated blade flake into the slot at least 1″ (2.5cm) beyond the end of the handle and remove the bark tie. Place one end of the binding strip in the slot on the “tip” end of the knife, take a turn around the stick, and tie a simple overhand knot around the stick and against the flake. Take another turn or two, then angle the bark toward the back of the handle. Make another turn or two against the other end of the flake, finishing with an overhand knot.
This is an excellent knife for fine slicing tasks and cleaning fish (see lower right).
Other Materials
Several materials can be used to make improvised knives. Other than bamboo, few woods can be sharpened to take an edge sufficient for slicing, but almost any wood or a piece of antler can be sharpened to a point for puncturing tasks.
Almost any scrap of metal can be sharpened against a stone, and a handle improvised only if desired. Even broken glass can serve as a useful blade, although a handle is a near necessity to avoid cutting your hand.
Keep It Safe and Legal
Knives cut. Forgive the obvious but, even while understanding that risk, people continually cut themselves with knives. The point isn't that knives are dangerous — we all know that. The point is that there are ways to use knives that significantly reduce the risk of accidents.
Risks
A key aspect of knife safety is understanding the specific risks — the circumstances in which a knife is likely to slip, leading to a loss of control and a possible encounter with an inconveniently placed body part.
Safe Grip
Different cutting tasks may force the handle in different directions, requiring a different grip on the handle. Likewise, the workpiece must be held, positioned, or secured in such a way that errant knife strokes will not cause injury. Both of these issues are addressed in the following chapters.
Safe Surroundings
Errant knife strokes can also injure other people nearby, and the knife user must make sure that people remain a safe distance away. This is especially true of children, who may need to be reminded often to keep their distance.
Safe Knife
A knife that breaks during use will almost certainly go out of control and will probably cause injury. That's why it's important to use the right knife for the job, and avoid subjecting a knife to stresses beyond its designed use. A thin blade is likely to shatter if used to pry, and when breaking it could either slip in a dangerous direction, or shoot a chip of metal into your eye. Even thicker blades can snap or shatter if abused, although softer steel is more likely to bend than break.
Sharp knives are safer than dull ones. That may seem counterintuitive until you understand that a sharp knife cuts more easily, requiring less force to do the job.
Should the knife slip, or should the workpiece pare more readily than expected, it's much easier to control the knife if you were pushing it gently than if you were bearing down hard.
Folding knives should generally be confined to straightforward cutting tasks. Any prying, twisting, or pounding procedure that severely strains the hinge might result in breakage or, at the very least, in weakening the hinge, reducing the knife's effectiveness and safety, and making future breakage more likely.
Higher-quality knives are less likely to break, but all are subject to wear. Examine your knives carefully, and repair or replace any that show signs of weakness.
Safe Use
Many common knife tasks are associated with particular accidents. Splitting firewood, for example, poses different risks than cutting a tree limb. See the following chapters for specific safety measures for specific tasks.
No matter how robust a lockback mechanism, never use a folding knife in such a way that the blade might close on your fingers or hand. With the exception of throwing knives, which have no place in your outdoor emergency kit, knives are not meant to be thrown. Avoid horseplay and refuse to participate in any knife “game” that involves an intentional threat to life or limb.
Knives and the Law
Knife laws can vary from state to state or province to province within a single country, and of course different countries maintain their own criminal laws. In some U.S. states, for example, carrying a knife with a blade more than 3′ (8cm) long in your pocket might contravene concealed weapons laws, while other states have no such concerns. Some jurisdictions consider a big sheath knife just another practical edge tool, while others classify it as a dangerous weapon. Check with local law-enforcement authorities to find out what you can legally carry and whether it may be concealed upon your person.
Children and Knives
One hundred and fifty years ago, it was common for a rural American schoolboy to carry a knife everywhere. Boys would play mumbledy-peg in schoolyards and whittle for diversion. Today, carrying a knife to school would result in immediate expulsion and maybe a trip to the police station. But children today are not more dangerous or less responsible than their great-great-grandparents, and there's no reason why a responsible child can't have and use a knife — after receiving proper guidance.
According to the American Knife & Tool Institute, teaching knife safety requires “the three Rs… repetition, reinforcement, and role models,” along with a fourth, “respect.” Every parent must decide when a child is ready to handle a knife. When that time comes, it is essential to teach the rules of knife safety and to be prepared to enforce them by confiscation if violated.
Parents of children who are too young to handle a knife safely should do what is necessary to keep their children safe, while parents of children who are old enough should encourage their responsible use of a practical tool.
Holding the Knife
A proper grip on the knife maximizes control for making accurate cuts and avoiding injury. Most knife injuries are the result of inattention or a sudden loss of control. In most cases of inattention, the injury is to the fingers or hand holding or steadying the workpiece: it's uncanny how you can place your own finger beneath the knife blade and then proceed to cut! Loss-of-control injuries can be worse—even life-threatening—because the knife might penetrate vital organs or major blood vessels.
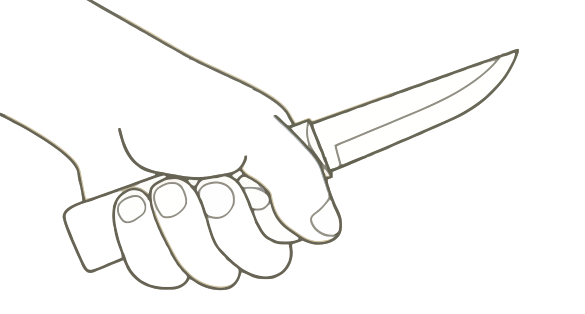
The Basic Grip
Most cuts are made with a grip so simple that there is no formal word for it: we'll call it the basic grip. The fingers wrap around the handle, and are joined on the same side by the thumb, the side of which presses against the handle. This is a strong grip, good for the heaviest cutting tasks.
You can get better control by moving your thumb to the top of the handle, and moving your other fingers slightly more toward the bottom. By moving the thumb forward, so that it is over the spine and just in front of the handle, even more control is gained, but at the expense of power.
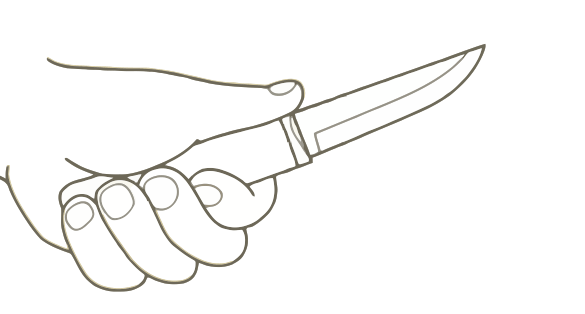
Grips for Careful Work
For very delicate work, rotate the knife 180° around its axis and move your whole hand forward so that only your third, fourth, and fifth fingers remain on the handle. Your index finger is curved loosely over the spine, and your thumb steadies the blade on the other side. This grip is possible only on a knife with no upper guard.
When holding the knife this way, the edge naturally faces your torso. This grip should not be used for cutting down or away from yourself. Do not use this grip for heavy work, as there is a real risk of cutting your fingers.
Holding a Sheepsfoot Blade
With a sheepsfoot blade, the hand can be moved all the way over the blade, which is held firmly between the thumb on one side, and the index and middle fingers on the other. This provides the ultimate in control for very light-duty operations, but it is dangerous for any other. In fact, this blade pattern was invented to give shepherds good control when trimming sheeps' hooves.
Holding the Workpiece
For many knife tasks, the workpiece must be held or steadied by the “off” hand, and sometimes other body parts come into play as well. This inevitably poses a risk of injury, unless care is taken in how the part is held. By safely securing the workpiece, the work can be done more precisely and quickly.
The Rule of Thumb… and Fingers and All the Rest
Any time you're about to begin cutting, look at yourself. Examine your position and think about the direction of the knife. Are any body parts in the way? How about if the knife slips? In what direction would your hand and knife travel if the wood were to separate unexpectedly, or if you were to hit an unexpected knot that might deflect your stroke? Would the knife then head toward your body?
It's surprisingly common for people to slice their own thumb when stripping bark from a stick, simply because they place their thumb right in the path of the knife. The solution, of course, is to hold the stick above where the cut will begin, but the real problem isn't one of technique: it's one of not paying attention.
Safe Workholding
It is often convenient to brace a workpiece against your thigh or chest while holding it with your off hand. This is fine as long as you follow certain safety rules.
When working in a sitting position, rest your elbows on your knees and hold the workpiece in front of them, so that your knife strokes away from your thighs. For a longer workpiece, another approach is to place it crosswise over your thighs, starting the cut to the outside of your on-side leg, and stroke away from your body. In other words, a right-handed carver with a stick across his thighs will stroke only to the right of his right thigh.
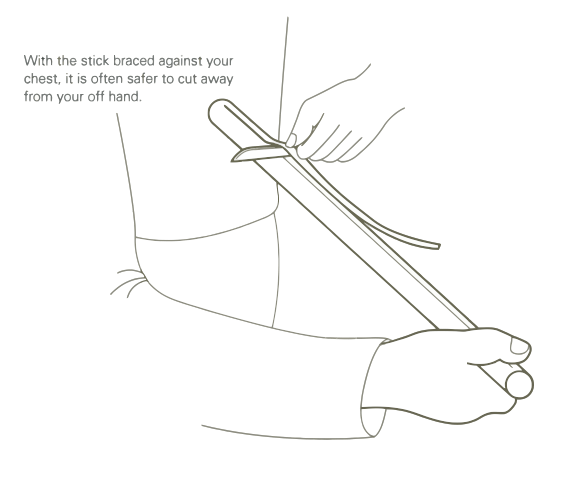
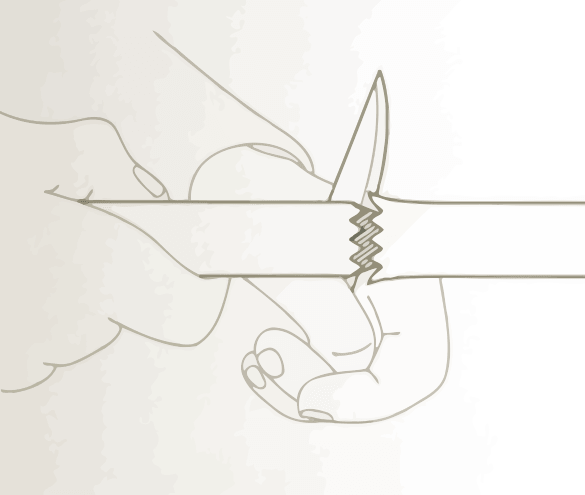
Bracing a Workpiece Against Your Chest
When bracing a workpiece against your chest, it may be difficult to position your off hand in such a way as to avoid danger on a downward stroke. It is often safer to cut toward your torso. This requires a different grip. Turn the knife over so that your knuckles are along the top of the handle and the blade faces toward you. Rest the side of your thumb on the upper side of the blade, and lock your wrist so that the knife edge is parallel to your chest or even pointing a little away from it. Draw the knife slowly upward along the top of the workpiece. Should the knife slip, your elbow's limited range of motion will prevent the knife from reaching your chest. Take care that the workpiece is held low on your chest, and that the knife's direction cannot lead it up to your face in case of a slip. Hold the elbow of your off hand high and away from your torso to keep it out of the way of an errant stroke.
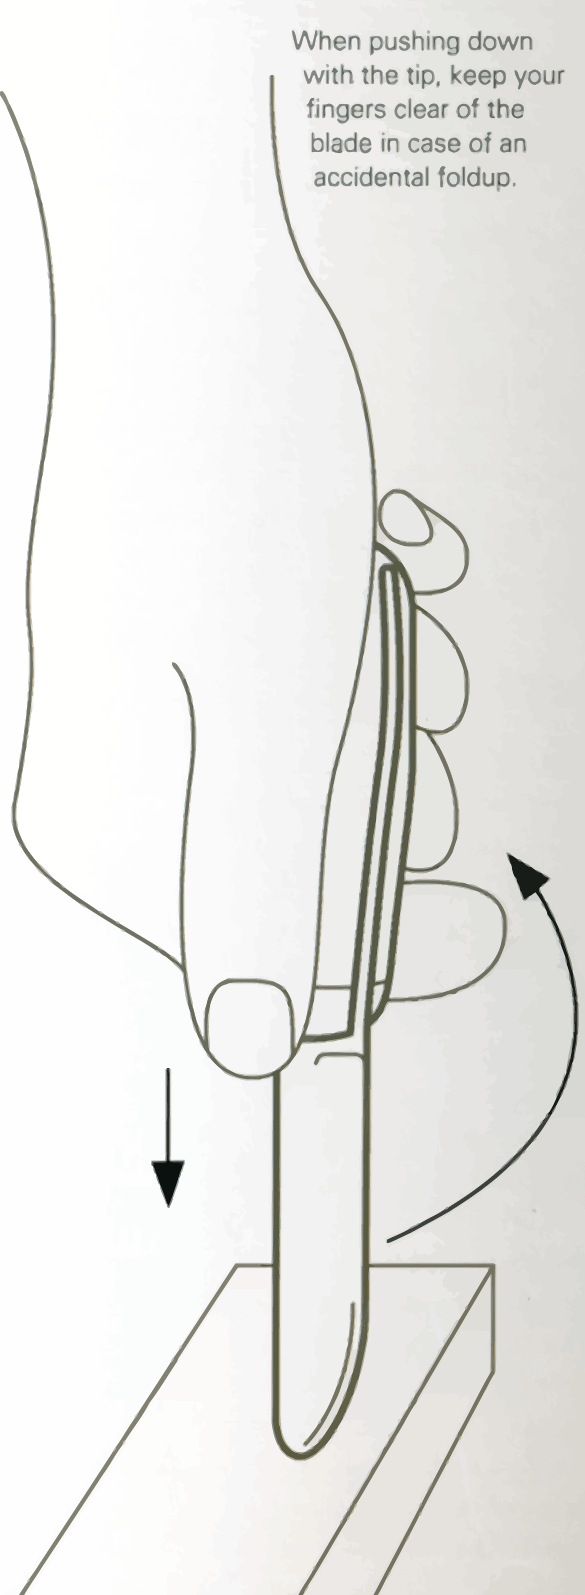
When cutting through or pointing a stick, it is often convenient to use the thumb of your knife hand to press the workpiece against the blade. To avoid a cut when the knife breaks through, make sure to hold your thumb off to the side, not directly in the blade's path. Likewise, whenever you use the thumb of your knife hand to stabilize the workpiece, keep it clear of the direction of cut.
Don't cradle a small workpiece in the palm of your hand. Instead, support it on a solid surface, such as a log, and hold it by the edges. If cutting into the end of a small stick, don't hold the workpiece close beneath the blade. Hold it lower down or, better yet, place the stick flat on a solid surface and cut it from the side.
Basic Cutting Techniques
With these basic techniques and a sharp knife of good quality, you can do an astonishing amount of work quickly. Learn and practice these skills before you need them in a survival situation, and you'll come to rely on your knife as a tool with almost unlimited utility.
Hip Cut
This is a good method for cutting a stick to length, or curving a blunt point. Because this powerful cut can take off a big chunk of wood in a single stroke, it involves a big follow-through. Make sure the area behind and to your on side is clear of people and obstructions.
Setup: Hold the stick in your off hand, with your thumb toward the end to be cut. Cross the arm over your belly and rest your wrist against your on-side hip so that the working end of the stick points down and behind you. Hold the knife in a basic grip.
Cutting Action: Raise your onside shoulder and bend the elbow. Push down vigorously on the knife, mainly using power from your shoulder. Toward the end of the cut, your elbow will straighten and your lower arm will swing behind you and toward your on side.
Cross-Chest Cut
This method is suitable for pieces too short for the hip cut. As described, it's a rough, powerful cut, but it is also useful for thinning a stick and trimming knots if performed with more finesse. The follow-through is in front of you, up and toward the on side.
Setup: Hold the knife in a reverse grip, with the fingers wrapped around the top of the handle and the cutting edge facing toward you. Hold the workpiece fairly close to the working end, but make sure your fingers are not in the way of the cut. Your hands will nearly meet in the middle of your chest, with the blade pointing up and the edge toward your on side.
Cutting Action: Use your back muscles to draw your knife hand and off hand apart simultaneously, so that your elbows move out to the sides. Both the knife and the workpiece will move against each other.
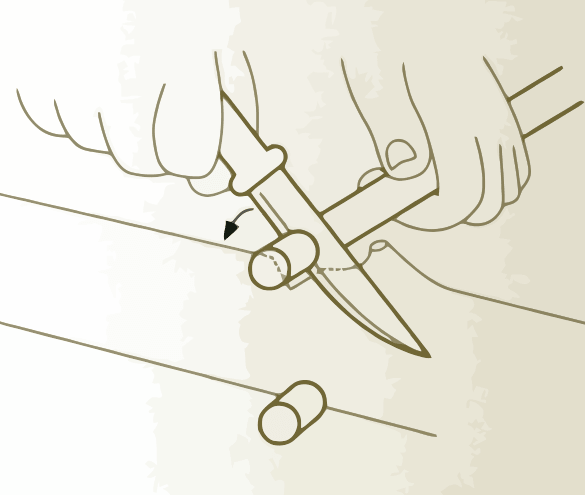
Thumb-Assisted Cut
This is a good way to cut a deep single notch in a short stick, or to notch a stick all the way around. It uses a similar body position as the cross-chest cut, hut a different grip on the knife. There is no follow-through. It can only be used with a knife that has no upper blade guard.
Setup: Hold the knife with the top of the handle facing your wrist, the second row of knuckles at the bottom of the handle, and your thumb against the spine of the blade just beyond the hilt. Both arms will be held in front of your chest at about 45° from vertical.
Cutting Action: Holding the blade across the stick, make the “stop cut” by pressing the blade in perpendicular to the surface, using power from your thumb to supplement the power from your wrist. Make a second cut about 1″ (2.5cm) below the stop cut at a 45° angle, so that it meets the bottom of the stop cut. Repeat if you wish to notch the stick all the way around.
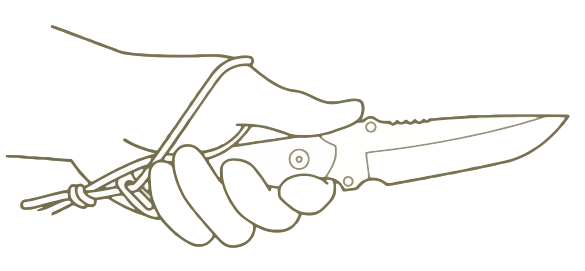
Lanyard Chopping
Most knives lack the heft to chop wood unassisted, so cutting, rather than chopping, using the methods above, is generally a more effective way of turning a long stick into sections.
Long, heavy sheath knives can, however, do an adequate job chopping sticks up to about 3″ (8cm) diameter. This can be aided with an especially sturdy lanyard, which enables you to hold the knife securely at the very end of the handle. By extending the knife just 1-2″ (2.5-5cm) farther, you increase the speed of its swing and thus increase its momentum, resulting in a deeper cut. Chopping, of course, is done by making an ever-deepening V-shaped notch. Turning the stick allows you to limit the depth of the notch to a maximum of the stick's radius.
In addition to being strong, the lanyard must be just the right length to lie firmly against your wrist while keeping the end of the handle solidly in your hand. If the lanyard is too long, you risk losing control of the knife.
Baton Chopping
With the use of a baton—which is simply a stick of the right length and heft—even smaller sheath knives become effective chopping tools. Almost any hardwood stick 10-12″ (25-30cm) long and l-2″(2.5-5cm) in diameter will do a good job. Don't use a stone. It could damage your knife or send chips into your eyes.
Place the blade against the work, with the tip extending beyond it. I use the baton to hammer against the spine directly over the work. Push down on the handle at the moment of impact to keep the blade straight and provide extra force behind the blow. For small limbs, a straight cut may suffice, but heavier work requires a V-shaped notch consisting of two cuts at opposing angles. If the cut is so deep that you can no longer hit the spine directly over the work, hit it on the tip of the knife as close to the work as possible.
Baton Splitting
Splitting wood with a baton is similar to chopping. Don't try to split pieces that are too large. Your blade must be at least a couple inches (5cm) longer than diameter of the wood.
Hold the stick vertical, preferably on a stump or a downed log. Press your blade into the end-grain at the top, with at least 2″ (5cm) of blade extending beyond the work. Holding the stick vertical with the knife, strike the spine of the blade, pressing down with your off hand on the handle.
When the split is nearly complete, you can twist the knife to complete the split.
Cutting Through a Stick
Cuts are made in pairs, forming a V-shaped notch. Make the first cut at about 30° from the vertical, then the next at the same angle but from the opposite direction, so that the notch has an angle of about 60°. Turn the stick and repeat, with the second notch joining the first. Continue turning the stick until you've worked all the way through. For a thicker stick, you may need to go all the way around more than once.
Tree Work
The days are long gone when outdoorspeople would cut fresh fir boughs to make a comfortable bed for the night. Trees are too valuable a resource to treat with such profligacy, and even relatively inexperienced campers now know not to cut live ones. Of course, it's also illegal on most public lands and all private land without the owner's permission. That said, we're talking about survival. No-one will object to you cutting down a live tree if your life depends upon it.
Limbing a Standing Tree
If a tree's trunk is small enough to reach around and see around, the best way to cut off small, low limbs is from the opposite side, using a baton. The trunk protects you from the knife's follow-through when the final stroke breaks through the limb. When cutting larger limbs in this manner, a helper can bend the bough down, stressing the wood fibers. They will cut much more readily this way, and maintaining downward pressure on the limb keeps the cut open so that the knife does not bind. Cut where the bend is at its maximum, and make sure the helper is clear of the baton and the knife's follow-through. Also be aware that a stressed limb or trunk can spring back dangerously when the pressure is released on cut-through.
If the trunk is too large to work from the opposite side, work with your arms extended and stand well clear when breakthrough is imminent. Use a V-notch cut if the limb is too thick for a straight-through approach.
Felling
If you're able to bend a tree trunk, you should be able to fell it with a fixed-blade knife and a baton. This generally means a maximum diameter of about 3″ (8cm), although this varies considerably with the particular tree and the length of your knife blade.
Bend the trunk down as far as you can. Trees that don't bend readily with a single effort can often be loosened by repeated bending so that eventually you can hold it down with your off hand. If you are working alone, batoning is not an option. Slice into the trunk at a steep angle while the fibers are being stretched, and rock the blade forward and back. You may be surprised how effective this is. Since you'll be working with your face close to the cut, be especially wary of spring-back when the cut nears completion.
A helper can make things much easier, holding down a larger trunk with his whole weight than you can with just your off hand. By freeing your off hand, the helper makes possible the use of the baton.
Limbing and Topping a Down Tree
Use the same principles of bending, stressing and slicing when working on the limbs or the top of a down tree. You may find it convenient to bend the limb to the ground and hold it there with your foot, but make sure your on-side leg is clear of your follow-through.
Notches and Holes
The techniques described in the previous chapter are suitable for completing fairly large-scale projects: building shelter, getting firewood, and such. Small-scale projects such as toolmaking require more refined skills—less muscle and more finesse.
End Notching
Being able to produce a square-bottom notch, or nock, in the end of a stick is a valuable toolmaking skill, useful for both ends of arrows and hafting stone knives and axe heads. A stick with nocks at both ends makes a handy reel for fishing line.
The process will shorten the stock by at least 1″ (2.5cm), so start with a stick an inch or two longer than the finished piece will be. Begin by making a small V-notch on the stick where you want the bottom of the nock. The length of the V-notch should be the same as the width of the nock. Turn the stick over and make another V-notch on the opposite side.
Turn the stick 90° and make another V-notch where the end of the stick will be cut off, then flip it over and cut another V-notch opposite it.
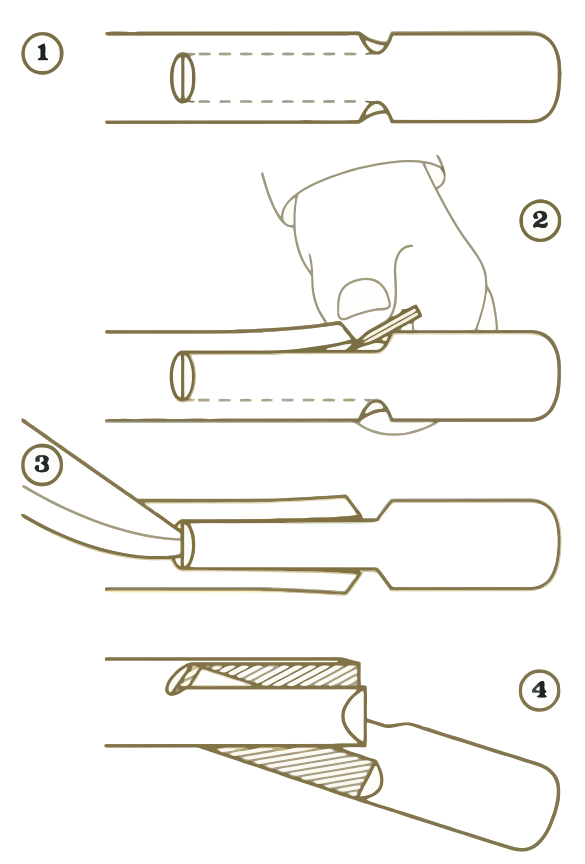
Place your blade in one of the V-notches nearer the end and, as you cut in, angle it parallel to the surface of the stick. Draw it down until it reaches the lower V-notches. Do the same on the other side. Use the tip of your knife to dig straight into the lower V-notches and break loose the end scrap.
- Start with two pairs of V-notches oriented 90° from each other and spaced about 1″ (2.5cm) apart.
- Cut from the upper notches down to the outside edges of the lower notches.
- Use the tip of the knife to deepen the cuts at the lower notches.
- Remove the scrap.
By cutting the lower V-notches first, you avoid splitting the stick farther than the desired bottom of the nock.

Hole Carving
A small square hole can be carved through a stick with a fine-pointed knife. A clip-point blade is a good tool for this job. The thickness of the stick and the width of your knife's tip will determine how small you can make the hole, but there is essentially no maximum size.
Begin with deep V-notches on both sides, then make a series of oblique slicing cuts down to the notch, removing each long, thin “chip” as you go. Work equally from both sides of the stick until it is thin enough.
Push the tip of the knife straight down across the grain of the wood, until it cuts to the width of the desired hole. Depending on the sizes of the knife and the hole desired, you might need to turn the knife around and cut the width in two steps, with the edge facing left and then right. If the first cut was the top edge of the hole, repeat the process to define the bottom edge. Next, push the tip of the knife between the top and bottom cuts along the grain and pry out some wood. Do the same to create the right and left edges of the hole, then turn the stick over and repeat these steps.
Shearing
A small stick can be quickly cut into multiple sections by turning a fixed-blade knife into a shear. On a solid, down log, excavate a narrow hollow just beneath a knot, so that you can insert several inches of blade at an angle of roughly 45°. Place the workpiece under the blade and press down on the handle. The knot should keep the tip in place and act as a fulcrum, allowing you to apply a great deal of pressure.

Switchblades that open with the push of a button are actually very helpful when you need to deploy a knife with just one hand, eg. when spelunking or mountaineering, or if you only have one good hand left (God forbid).
Switchblades that open with the push of a button are actually very helpful when you need to deploy a knife with just one hand, eg. when spelunking or mountaineering, or if you only have one good hand left (God forbid).
Overall, really good one-stop shop article for the knife novice. A few errors in the content (especially in the "Knife terminology" diagram, i.e., encouragement of the ridiculous term "blood groove" instead of the proper name "fuller") , but nothing so serious as to require a cautionary warning to would-be readers EXCEPT the "Bracing a workplace against your chest" section. There is absolutely NO reason to use that method in a survival/bushcraft scenario given the safer, best practice methods available. Better guidance for hand sizing a knife (ergonomics) and mentioning the use of gloves would have been nice, but overall a decent article.