Growing Bonsai from Cuttings
Table of Contents
Propagating bonsai material from cuttings has several advantages. It is very easy and reliable. The new plants always have the same characteristics as the parent. You can often use the prunings that you would otherwise throw away from routine pruning.
There are two kinds of cuttings: softwood and hardwood. Softwood cuttings come from the current season's soft new growth. Usually, therefore, you should take softwood cuttings from around late spring to the early summer when the parent plant is growing vigorously.
Hardwood Cuttings
Hardwood cuttings come from wood that is fully ripened, and sometimes even several years old. Take these during autumn and winter. Many bonsai enthusiasts, however, successfully take cuttings at what is supposed to be the “wrong” time of year, recycling prunings from their existing bonsai rather than throwing them on the compost heap.
Make sure the cuttings material is healthy and vigorous. To prevent the cutting from losing moisture, maintain humidity around it until it has calloused over and begun to root. Use a mist-spray, or cover the cutting with some glass or plastic protection, such as a propagator, a cold frame, or a greenhouse. However, hardwood cuttings from many species will “strike” from material pushed into the open ground without such protection.
Softwood Cuttings
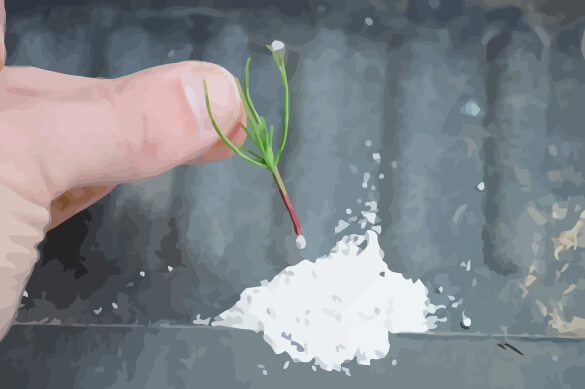
These softwood cuttings are taken from Cryptomeria japonica Yatsubusa', the dwarf Japanese cedar. Nip off the chosen shoot just below the junction of a side shoot (where most of the natural plant hormones congregate and promote root production in the cutting).
You can use a standard plastic seed tray, although an earthenware alpine pot allows the cuttings extra depth for root growth, and its clay walls provide better drainage and insulation for the soil. Use an appropriate potting mixture for the species; here, a mixture of one part perlite and one part peat moss forms the rooting medium.
Propagating the Cuttings
- First, prepare the pot. Cover any large drainage holes with plastic mesh to prevent the soil from trickling out. Add a layer of coarse grit, and then fill up the container with the soil mixture.
- Hold the chosen cutting material upright and trim it off the parent plant. Use very sharp scissors to make a really clean cut.
- Trim away all needles and side shoots from the bottom third of the cutting. If you fail to do this, the cutting will rot at the base when it is inserted into soil and the cutting will fail.
- Make a hole in the soil with a chopstick, dibber, or pencil. (It is important that the severed end of the cutting is not damaged when it is inserted into the container.)
- Carefully place each cutting in its hole; lightly press down the surrounding soil to keep it in place. Do this for each cutting until you have filled the container.
- Water with care to avoid disturbing the cuttings. It is important also to label the pot with the plant name and the date on which the cuttings were taken.
After Care of Cuttings
Place the container in an unheated greenhouse or a cold frame and leave the cuttings to root and grow on. Water regularly; otherwise the cuttings need no further attention for a year.
One Year Later
The cuttings should be showing considerable growth, roots should be growing through the drainage holes, and the container will be quite crowded. It is then time to transplant the cuttings into individual pots to give them the space they need to develop into bigger plants.
Potting up
Always use free-draining soil mix for repotting your cuttings. Lift each-cutting from the container and trim back the long roots. Replant it in a 3 inches (7.5 cm) pot and leave to grow on for a year, before planting it out in open ground, or a larger pot, to thicken the trunk.

Leave a Reply