38 Bicycle Tools for Any Repair Job
Table of Contents
Even if you're just a recreational cyclist, chances are sooner or later you will need to do some minor repairs to your bike. It may not be convenient to take it to a bike shop or just not worth the money you'll pay them especially over the long-term. Having a few simple tools around can go a long way in keeping your bike working smoothly. For those looking to take their bike repair and maintenance efforts to the next level, perhaps as a side business, you'll have to bite the bullet and invest in more tools. Regardless of your situation, don't be fooled into thinking that having the right tool automatically means you can fix things. Take the time to learn the proper procedures!
Tools for Bike Enthusiasts
Repair Stand
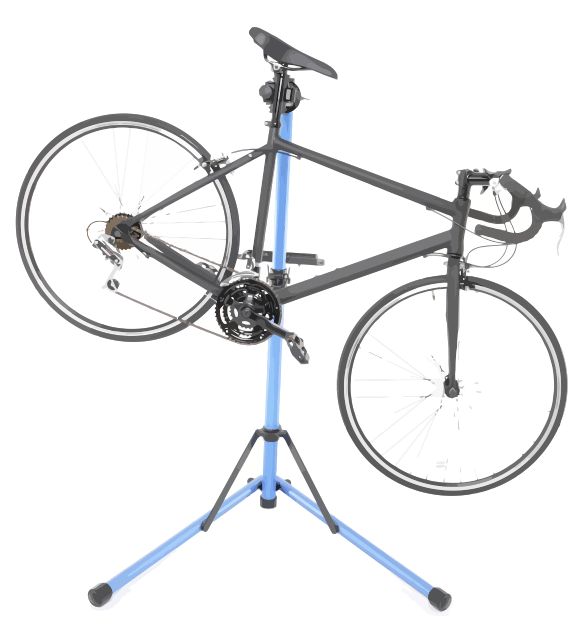 You don't need to purchase an industrial bike stand, but do your research. A repair stand can make maintenance much easier and so you're more likely to keep your bike tuned. A stand will also keep your bike from scratching walls since you won't be leaning it while doing repairs. When shopping around consider purchasing one that can have its height adjusted; with jaws that have plenty of padding to protect your bike; that has wide support so it won't tip over; that can be swivelled so you can easily tilt your bike forward or backwards; and that is made of strong material so it will last many years.
Tire Levers
 Most of the time you may be able to remove and reinstall a tire by using your bare hands. Using your hands is usually preferred since it eliminates the possibility of damaging the tube. However, some tires are simply too tight, especially when they are new, and you will need tire levers. You should always have at least 2 levers with you, but 3 is better. They can be made of metal or plastic. If you opt for the plastic ones make sure they are strong otherwise they will snap in half the first time you use them. Do NOT use things like a screwdriver to remove/install a tube/tire as you will almost always puncture the tube.
Bicycle Pump
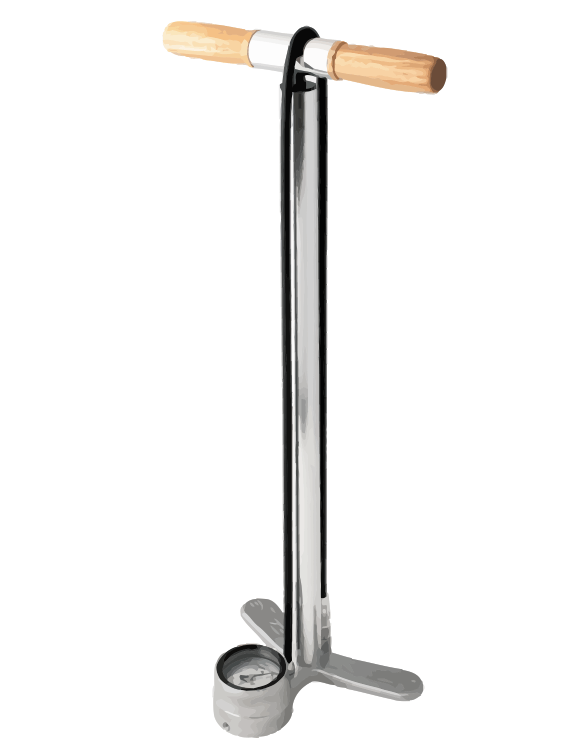 An air pump is a vital tool for even the casual rider. I advise that you have two pumps: a portable one for taking with you on your rides and a floor pump for home use. It is difficult to find a portable pump that can easily fill high pressure tires to their recommended psi, but at least it will allow you to finish your ride in case of a flat. The floor pump is much more powerful and easier to use. I suggest you spend a bit extra and get good pumps. This will ensure ease of use and higher pressure, especially for high pressure road bike tires which sometimes can take up to 130 psi.
Spoke Wrench
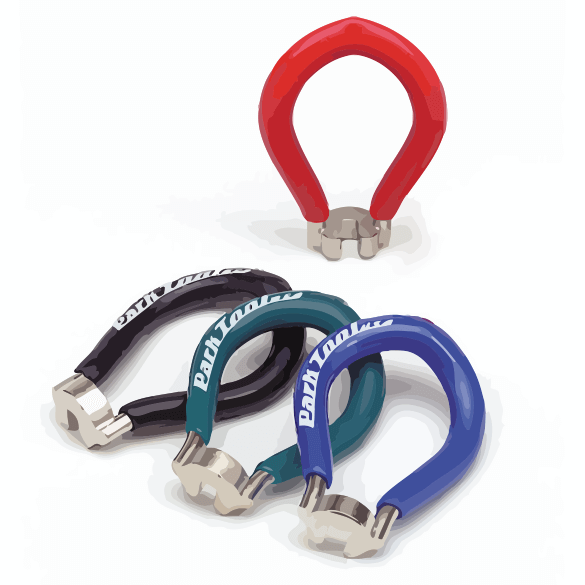 Almost all wheel spokes will need minor adjusting at some point. Buy a spoke wrench that has multiple diameters or be sure to measure the diameter of your spoke nipples and buy one that fits. Most people have a good spoke tool at home that fits their spokes, but carry a multiple diameter tool when they are out riding in part so they can help others. There are several shapes and sizes of spoke tools so consider testing them a bit to see which one feels best in your hand. They are also made of different materials, with the more expensive being more durable and resistant to being stripped while also less likely to strip your spokes.
Chain Cleaner
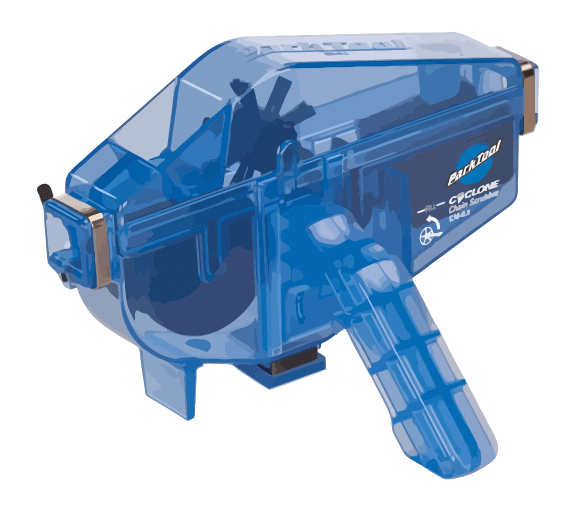 Any serious cyclist will tell you that a clean and properly lubed chain will make a big difference in the quality of the ride. In addition, a clean chain will reduce wear on other more expensive parts of the drive train. If you have a good quality chain cleaner it will make cleaning the chain easier and you so you'll probably do it more often. Along with the cleaner you will need a good quality chain degreaser and a chain brush. After using these tools, clean them thoroughly so they will last longer.
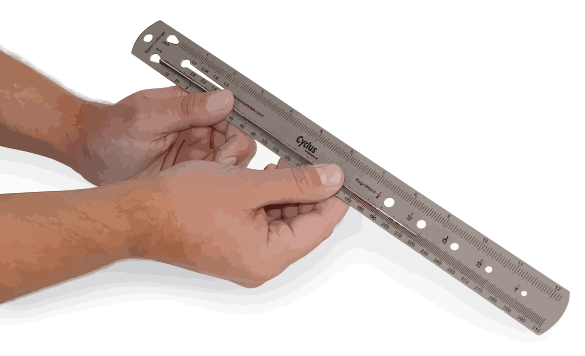
Chain Wear Indicator/Gauge
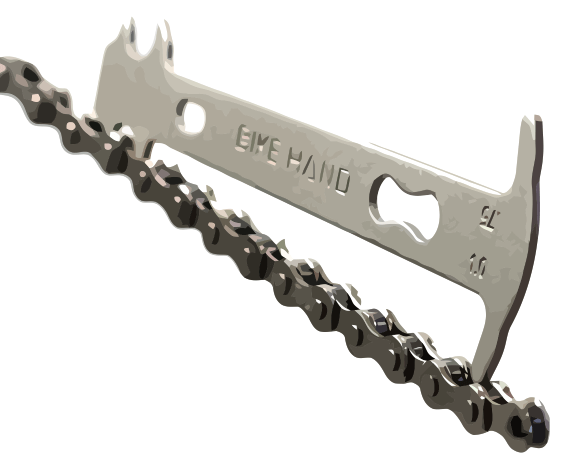 This little tool can easily be used to check the wear on your chain. You should check for chain wear regularly and if you ever notice your chain skipping, especially when you are climbing, the first thing to check for is chain wear. An old chain will wear more quickly wear out other, more expensive drive train components. So replacing the chain when needed will go a long way in prolonging the life of other parts. If you don't want to spend the money on an actual tool you can also use a regular ruler. The distance from the centre of the pin of one link to the other is exactly 1.0 inch. Remember though, one full link is both the inside and the outside plates, so there is an extra pin in between your measurements (one inner and one outer). To make it visually easier, measure 12 inches and see where the 12 inch mark lines up. If the 12 inch line on your ruler falls outside of the pin then you need to replace your chain.
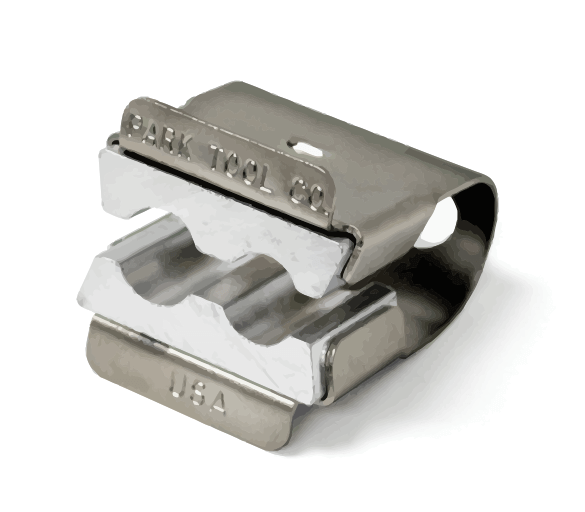
Cable and Housing Cutters
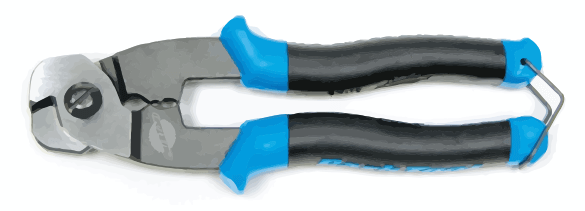 Proper cutters are specifically designed for bicycle cables and housing. You may think you can do the job with regular wire cutters and you probably can, but the cuts won't be nearly as good and as clean with bicycle-specific cable cutters. After the cable housing cut, you may need to check the opening to make sure the metal is not obstructing the hole opening. Use a small round file to smooth out the edges.
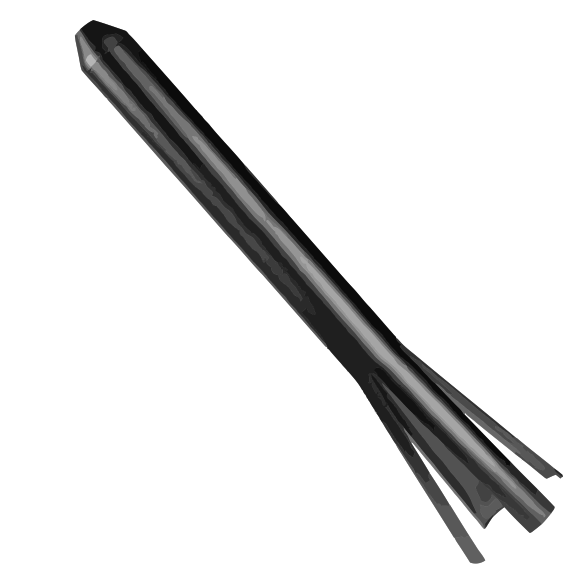
File
This is a general tool that can come in handy in a couple of applications. For example, after cutting cable housing, a file can be used to clean the opening and remove any rough edges. Also, filing the seat tube opening of a new bike before inserting the seat post can prevent scratches on the seat post. Files come in different shapes and sizes. You should have a thin round one plus a small flat one.
Chain Tool
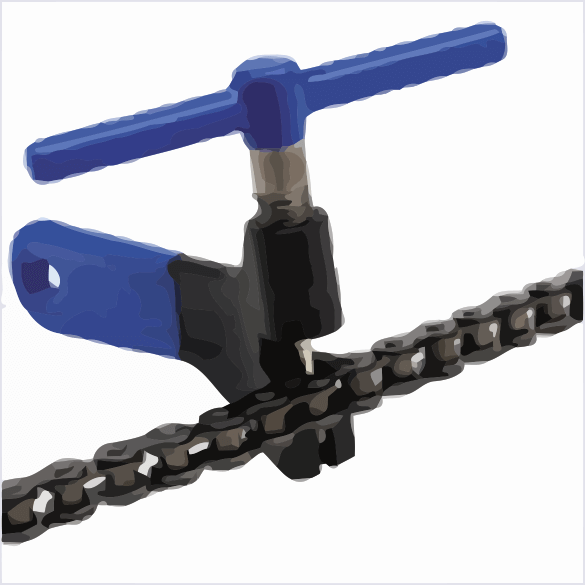 I usually keep a small chain tool in my ride kit and a better/bigger one at home. Some of them come as part of a portable multi-tool. When shopping around look for one with a good handle and closely examine the part where the chain sits. If the chain doesn't sit properly your job will be much harder. Make sure you have a proper replacement pin before you start the job. The pin you remove should not be reused. This tool is vital because you never know which link will break. However, for regular maintenance consider having a removable master link on your chain, as it will make removing the chain and therefore cleaning often a lot easier.
Allen Keys
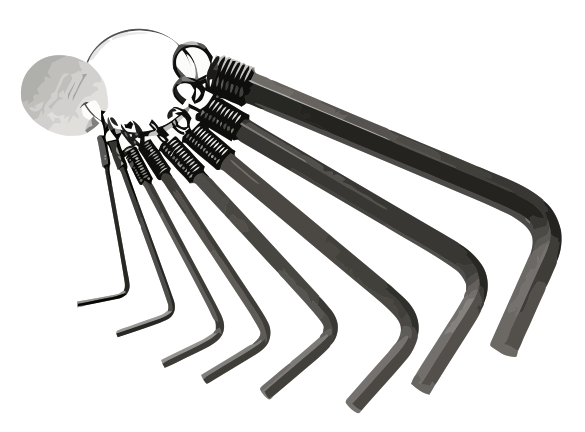 These tools are sometimes called hex wrenches. Most screws on a bike require this tool so you can't really get away with not having at least one set. A foldable will do for your ride kit, but a proper set of individual keys will be better for home use. The basic metric sizes are: 2, 2.5, 3, 4, 5, and 6. Note that metric and imperial sizes differ slightly. You may choose to also obtain larger ones for hubs if you plan on doing those kind of repairs. Some allen keys have a slight rounding (called a ball-driver) at the tip so you can access bolts that can only be reached at a slight angle. Be careful not to round out the bolt or the allen key though.
Screw Drivers of Various Sizes
These will be needed to adjust the high and low screws on both derailleurs, brakes, and to install accessories. Any tool box needs a basic set of screw drivers. However, I suggest you buy good quality hardened steel, otherwise you may damage the screws or the tips of the screw drivers will bend. Also, get a variety of sizes so they will fit snugly and avoid damaging the screws.
Lubes
There are many moving bike parts that need lubrication, some more often than others. For example, when installing new cables a dab of lube will help it function more smoothly while also resisting rust. A bit of lube on the moving parts of the derailleur will make shifting easier and smoother.
But the most important of all is the chain which needs to be lubed regularly. But never lube a chain while it's dirty. The frequency will depend on how much you ride and the riding conditions e.g. if you get stuck riding in the rain you should clean it and re-lube the chain as soon as you get home. Make sure you buy a good quality chain lube, specifically designed for bicycles. Never use any other kind of oil or lube as it may not do a good job. For example, car oil will not function in the colder operating temperatures of a bicycle.
Grease
Unless you are taking things apart you probably won't need grease. However, it might be a good idea to keep some around as you should apply just a tiny amount to all screws and bolts before installing them. This will prevent them from binding and reduce rust. Another place to put a bit of grease is the seat post before installing it to keep it from binding to the seat tube over time and to reduce rust. If you are going to take components with bearings apart then you'll need to clean them and degrease them before reassembling. Warning: do not use lube or grease on press fit items. Press fit items are those where two parts that are held together purely by pressure only i.e. no screws or bolts.
Prosumer Tools
Torque Wrench
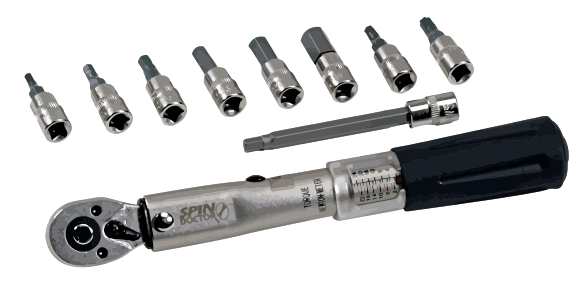 A torque wrenche is an underused, but important tool. Even many mechanics do not realize the importance of proper torque or believe they can predict it by ‘feel.' The consequences of incorrect torque include:
- Not tightening screws/bolts enough so that they eventually fail to hold e.g. the cable pinchers during sudden breaking or the handle bar stem during sudden steering.
- If the screws/bolts are too tight the threads may strip, perhaps not being obvious until you are out riding and the brake cables slide through the pincher.
Everything from handlebars to cable pincher screws should be tightened to recommended manufacturer tension. The only thing you don't need to worry about is your water bottle holders.
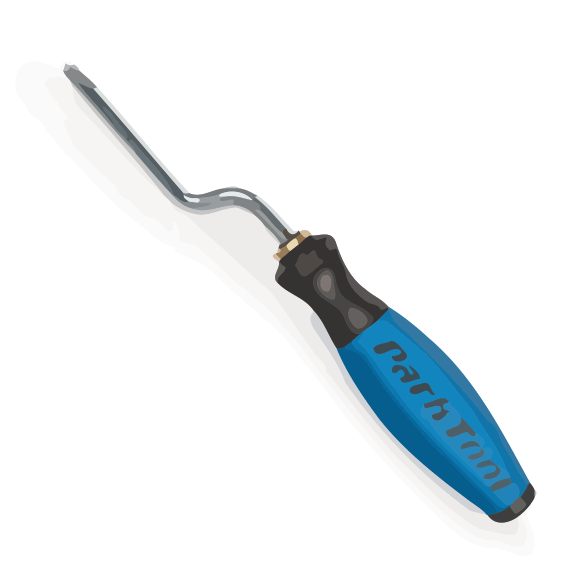
Pedal Wrench
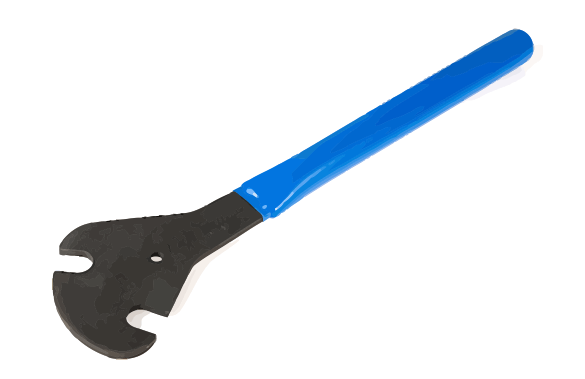 You may be able to get by without a pedal wrench by using an adjustable wrench. However, most bikes leave little room to get a thick adjustable wrench in place to be able to turn the pedal. A pedal wrench is much thinner and can fit easily into the required space. The most common size is 15mm, but some pedals require a 16mm or a 17mm, so check your pedals first before you make a purchase. Some more expensive pedals may require a hex wrench for removal. And keep in mind that the pedal on the left sided is reverse thread. If you turn it the wrong way you will over-tighten it and possibly strip the threading. Pedals on the right side thread in the ‘normal' direction. This is a safety feature so the left pedal won't come loose while riding.
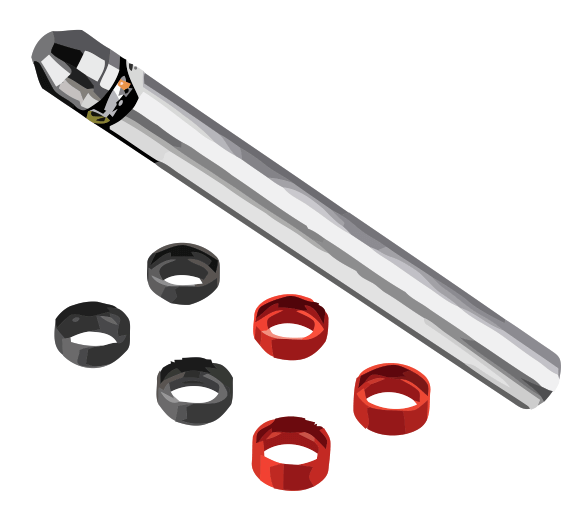
Headset Wrenches
 These are wrenches that are needed to remove the head set. They are usually double sided. The bad news is you may require different sizes and sometimes two of the same size. The reason for this is because you may need to hold one locknut in place while you turn the other one. The good news is that most bikes now come with headsets that don't have locknuts i.e. threadless headsets. The sizes of locknuts of threaded headsets can vary from 30mm to 40mm. Remember, if you are going to disassemble the headset you will need to clean it and then re-grease it. Also, if you come across any damaged parts they will need to be replaced.
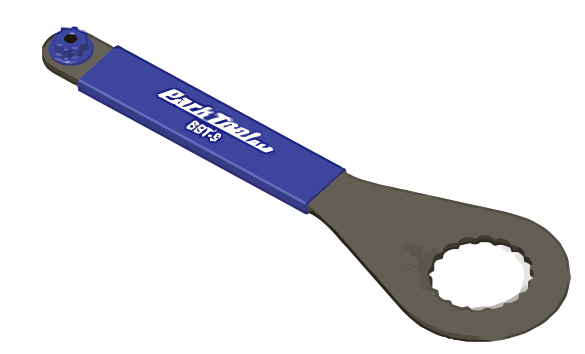
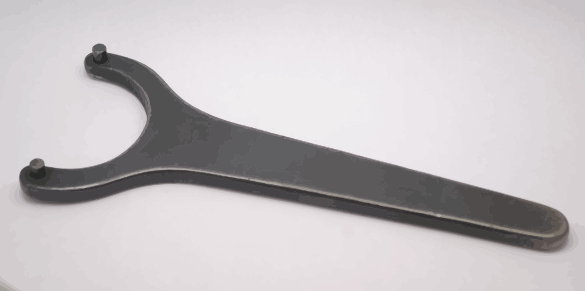
Freewheel Remover and Wrench
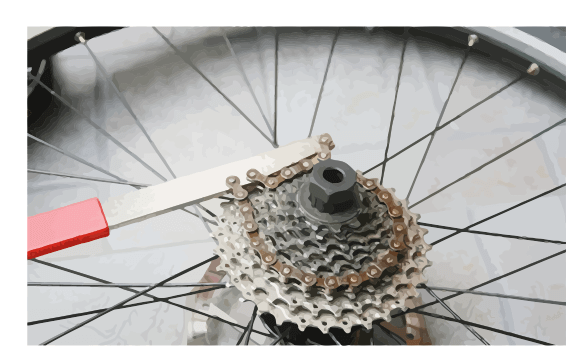 The freewheel is the part of the drivetrain that holds all of the rear sprockets which can range from a single-gear to an 11-speed. The freewheel usually needs to be removed for cleaning or replacement. Before making a purchase check to see which removing tool your bike requires as there are several to choose from and they're not compatible. In addition, you will require a chain whip which clamps onto the sprockets and holds the freewheel in place so it won't rotate when you apply rotational pressure to the locking nut. And if that wasn't enough, you'll also need a type of wrench to hold the removing tool. Warning: there are ways to remove the freewheel without these tools, but trying to do so will most likely destroy the freewheel.
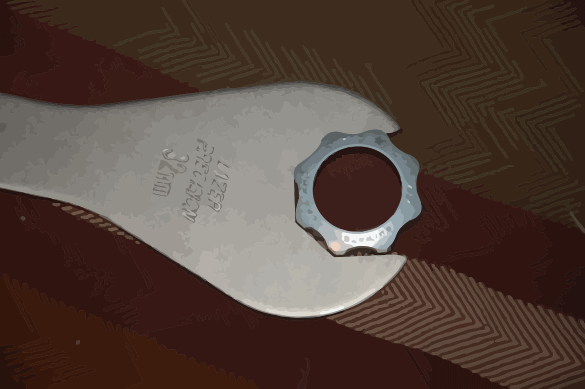
Bottom Bracket Wrench
 The bottom bracket is the section that passes through the frame to connect the two sides of the crank. This unit is usually sealed and only needs to be removed for replacement purposes. Occasionally, it may need a bit of tightening if you feel some ‘give' as you cycle. There are multiple sizes and various designs so check before you buy. Before you can remove the bottom bracket you will need to remove the crank bolt on the drivetrain side.
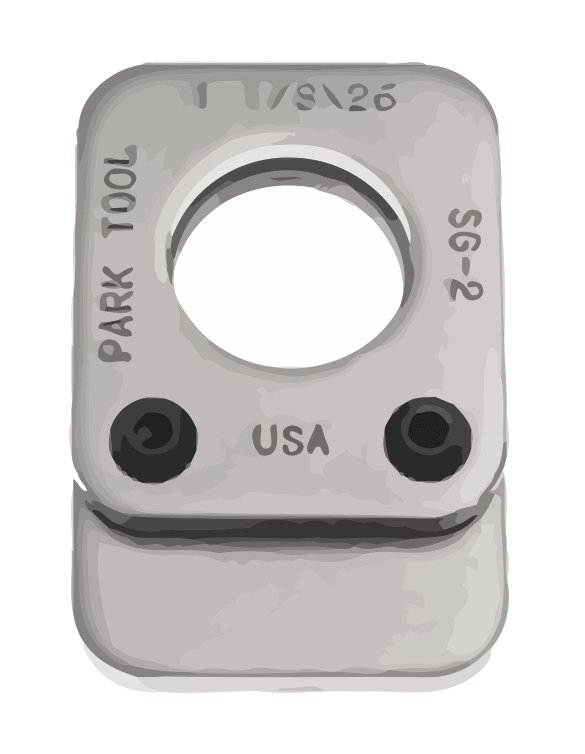
Pin Spanner
 This handy little tool will usually have two protruding pins. It is needed to rotate the locking ring which will then allow the bottom bracket to slide out. Pin spanners come in a variety of sizes and types so before you buy check to see which one fits your bike. Some lock rings have holes on the front while others have them on the side. I suggest you do not try to remove the lock ring with any other method as this may damage the lock ring and then it may be much harder to remove and will need replacing.
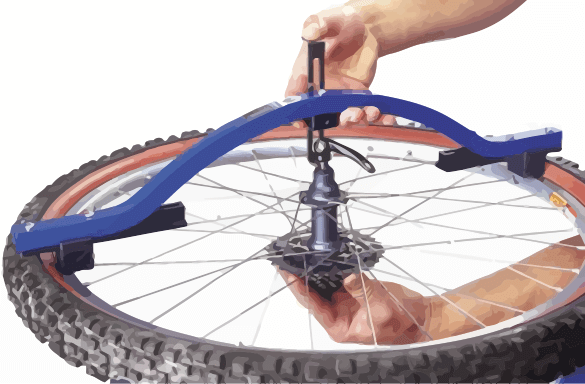
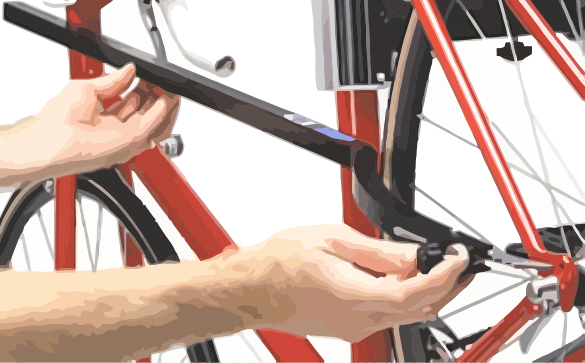
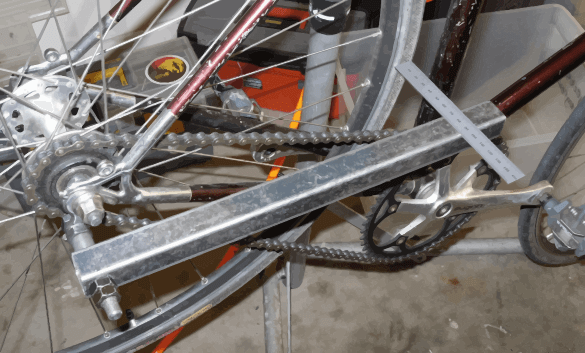
Wheel Truing Stand
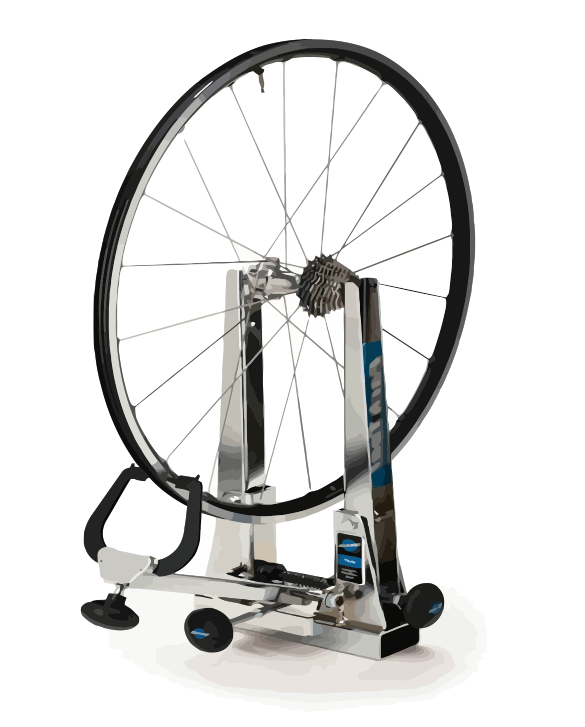 This is a stand specifically designed to hold a wheel so it can be trued. This process involves tightening opposing spoke nipples to pull the wheel straight. And, while a bit of truing is not too difficult, if you don't know what you're doing you can quickly make your wheel worse. You see, besides lateral movement of the rim there is also radial movement, which is the up and down movement when you look at a wheel from the front. There is also dishing, which is offsetting the rim from the hub. If you start messing around with these, without knowing what you're doing and without the proper tools, you may soon find yourself walking your bike to your local bike shop.
Truing Stand Dial Indicators
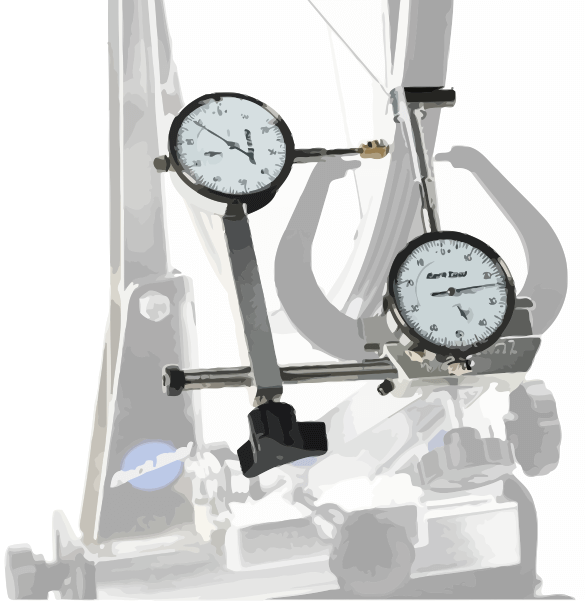 These dials attach to the truing stand, if it allows for their attachment, and facilitates greater accuracy on how true a wheel can be made. It removes the visual guessing game of the mechanic trying to detect minute spaces between the rim and the metal rods of the truing stand. They can also be used to adjust/test for radial truing (mentioned above).
Another tool for wheel building, not shown here, is a dishing tool. This allows the builder to make sure the hub is in the proper place in relation to the rim.
Spoke Tension Meter
 This tool will measure spoke tension, as a proper range is vital for a healthy wheel. Many mechanics think they don't need one and they work by feel, but their accuracy is questionable. Incorrect tension, whether it's too tight or too loose, even by a few units, can lead to spoke failure and perhaps an accident. However, too much tension could permanently damage the wheel rim which could mean hundreds of dollars down the drain. Makes purchasing a $30 tool sound like a good, no?
Professional Tools
 Digital hanging scale
For high-end stores this could be used as a selling tool. By having this scale available at bike shops or by having bikes hanging from them in the window, potential consumers can quickly compare weights of different bikes. After all, many cyclist are extremely concerned with bike weight. Occasionally, they may need recalibrating.
Table Top Scale
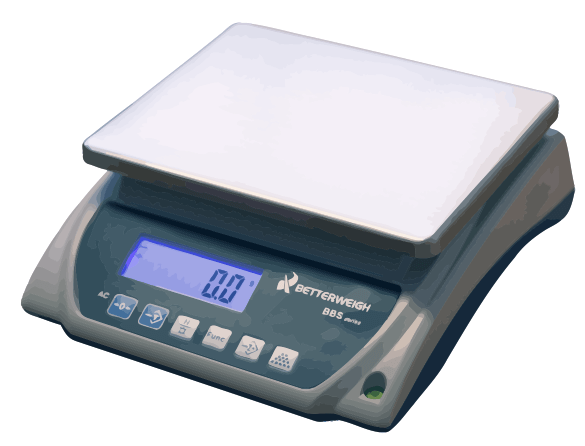 Another selling tool for high-end shops, especially for road racing bikes or triathlon bikes. Having it available so consumers can weigh different components for comparison purposes could boost sales. There are electrical and non-electrical options. Occasionally, they may need recalibrating.
Digital Caliper
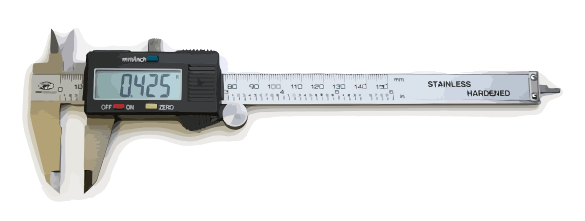 This is a device that can be used to measure outside diameters and inside diameters of just about anything on a bike, from nuts to tubes. Their maximum length is usually 6″ (15 cm) in length but larger ones can be purchased. This tool can also be used to measure gaps that need to be filled by spacers or need to remain unfilled, such as the part of the fork that extends upwards.
Wheel Alignment Gauge
 A wheel alignment gauge is needed because such measurements can't be done visually. The tool is used to center the rim between the locknuts of the hub. You don't need an overly expensive one, but make sure it's sturdy enough so it will not bend which would make it ineffective. When not in use, hanging the tool so it won't get damaged by accident.
Nipple Driver
 This tool looks like a screw driver with two bends at the tip. It is used to quickly put on new spoke nipples or to quickly remove nipples once the spokes have been loosened. This is one of those tools that looks useless, but anyone who has ever built a wheel will swear by its usefulness. Note: it is not used to fine tune or to true a wheel, as it is not strong enough to be used under torque.
Spoke Ruler
 As the name implies, this tool is used to measure the length of a spoke. It's only really needed if you are cutting your own spokes. If you are going to build a new wheel it's a good idea to measure all of the spokes before starting, as it is better to catch an error early on. Keep in mind, for a rear wheel the right sided spokes will be slightly shorter because of the freewheel. So don't get them mixed up!
Axle Vise
This handy adaptor fits into a table vise. It holds the axle so it will not turn while you're working on it. It's value comes from being made of softer material so it will not damage the axle, assuming you don't over tighten. There are usually at least two differently sized openings.
Head Cup Press
 If you are going to work on the head tube, including removal of the cups, you will need this to reinstall them. The tool will allow you to apply enough force so the cups will ‘snap' into place. The cups are press-fit, and require force to go into place. Not using this tool may result in the cups coming loose. There are various sizes of head cups. Note: do not use lube with press-fit cups.
Head Cup Remover
 This tool performs the opposite task of the head cup press mentioned above i.e. it is used to remove head cups. The tool allows you to use force from the inside of the head tube so the cup will fall out. You will probably also need a mallet. You can also use a very long and strong screw driver, but this tool is more efficient.
Adjustable Crown Race Puller
This is an expensive tool used to remove the crown race, usually found on the fork tubes.  Unfortunately, there is no other easy way of removing a crown race, so if you plan on doing this type of job you will need this tool.
There are blades on this tool that are thin by design. Their thinness means they will need to eventually be replaced and can be bought separately.
Frame Alignment Gauge
 Something most of us have never thought about, but with this tool you can check the alignment of your frame. It's usually only needed if your bike is involved in a crash and doesn't feel quite right afterwards. The tool allows you to line up the seat stays and chainstays, along with the seat tube and the head tube.
Derailleur Hanger Alignment Gauge
 You use this tool to check the rear derailleur hanger. If the hanger is bent, it may impact the gearing system. The hanger is designed to bend or break during an impact, therefore protecting the frame and gearing components. The problem is that there are many hanger designs and to get a replacement will most likely require contacting the manufacturer. Not many stores carry all of the hangers available. Sometimes hangers can be rebent into place.
Crown Race Setting System
 This is a hollow metal tube that fits over the fork tube and used to install the fork crown race. There are usually various inserts to ensure proper fit. Slide the correct insert then slide the tube over the fork tube. Then, use a mallet on the end of the tube cap to apply force. This will seat the race into its proper position. Make sure it falls into place evenly by checking for slight spaces all the way around.
Thread Saw Guide
 When using a saw this device will keep the blade aligned so your cut is straight. Without such a tool it's almost impossible to make a straight cut. It's ideal if you have to cut a fork or to shorten straight handlebars. Before cutting any part of your frame make sure you know what you're doing as a mistake can render your frame useless. Beware that carbon fibre parts should first be covered with tape to avoid carbon dust from being inhaled and use specialized blades.
Fork Threading Set
A heavy and expensive tool used to re-thread a fork. Thread repairs are usually needed 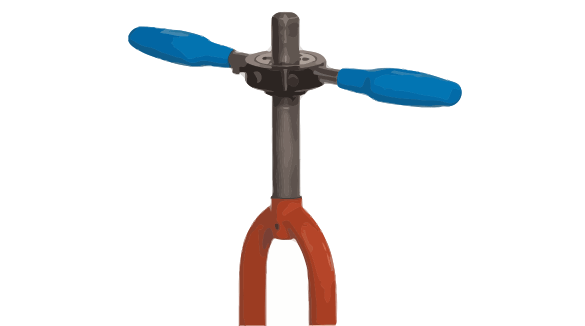 if you installed a component at a slight angle and ruined the threads or if you wish to thread a larger part. Warning: some materials are easier to rethread than others. Also, this tool is easy to damage so follow the maintenance instructions, go slow when threading, twist backwards every single turn, and use plenty of lubrication.
Crown Race Cutter Adapter
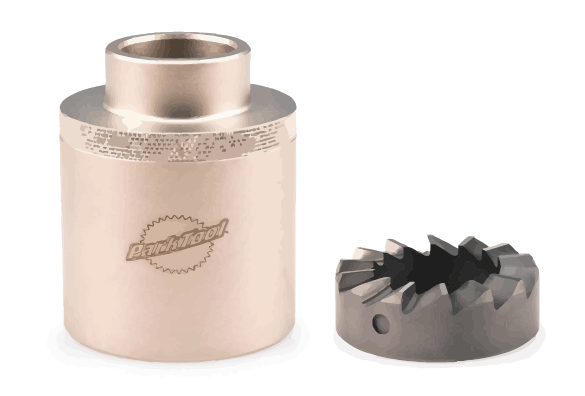 This is a round attachment that will shave a bit of material off of a round surface in order to smooth or even it. It's usually used at the bottom bracket. Another expensive tool that needs to be looked after quite a bit e.g. if a tooth chips the entire tool will become useless. As far as the cutting job goes, you need to know what you are doing or you will most likely damage the frame.

Leave a Reply