Planting Bonsai on Rock
Table of Contents
- Choosing the Rock
- Rocks for Clasped-to-Rock Plantings
- Deciding on a Clasped-to-Rock Planting
- A Complete Rock Planting
- Planting a Clasped-to-Rock Design
- Preparing the Materials
- How to Prepare Anchorage Wires
- Finding the Best Angle
- The Choice of Materials
- The Clasped-to-Rock Planting
- Root-Over-Rock Style
- Training the Roots Over The Rock
- Potting the Tree
If you want to increase the impact of your bonsai, introducing one or more rocks is a good idea. Solid, elemental-looking rocks can give the impression that a bonsai is part of a landscape. A single rock can resemble a rugged cliff, a towering mountain, or a rocky island. A group of smaller rocks, positioned as outcrops protruding from the soil of the bonsai container, can recall the rocky terrain in which the tree lives. Use a slab of rock or slate instead of a traditional container to make a design look especially natural.
Choosing the Rock
The first element of a successful rock planting is to find a beautiful rock, and then set it off with one or more appropriate bonsai plants, so that all elements of the design seem as one.
Many types of rocks exist around the world, but some are better than others for rock plantings. The best kind for bonsai work is a hard rock that will not crumble away. It should also have attractive color, shape, and texture. A popular choice is the Japanese Ibigawa rock shown opposite; it is a volcanic conglomerate, a mixture of different rock types welded together by the heat of a volcano.
Do not use marble or quartz because their shiny, glittering textures will detract from the natural effect of the trees. Frost may split the strata lines of sandstone and other types of sedimentary rocks.
Soft rocks are seldom useful for root-over-rock and clasped-to-rock styles, as they erode too quickly and easily. Soft, non-sedimentary rocks like lava rock and tufa, however, are easy to shape, so you can hollow out a section and plant the tree in it as if in a pot.
Rocks for Clasped-to-Rock Plantings
The rock is the most important part of the design, because it dictates what type and size of tree or trees you will use. A round, smooth rock suggests a watery scene, so you will enhance it with waterside trees like willows. Choose a craggy rock, and you will need to plant it with trees of the mountainside, like birch, juniper, pine, and spruce.
Pay particular attention to the rock's shape and type. It should be intrinsically interesting: a bland rock is unlikely to result in a good planting. On the whole, pick a rock with a natural-looking shape, but you should not find this a limitation because nature produces a wide range of fantastically contorted mountains, boulders, and rocks. Pleasing texture and color are also important: black and shades of gray are usually impressive.
Deciding on a Clasped-to-Rock Planting
Look at the rock from all angles to choose the best view for the “front” of the design. Next, decide what scale the design will be, whether the rock is to represent a mountain, a cliff, or a boulder, as this will dictate the kind and size of plants you plant on. A forest of small trees would make the rock seem a distant mountain, whereas a single tree two-thirds the size of the rock would make it look like a boulder.
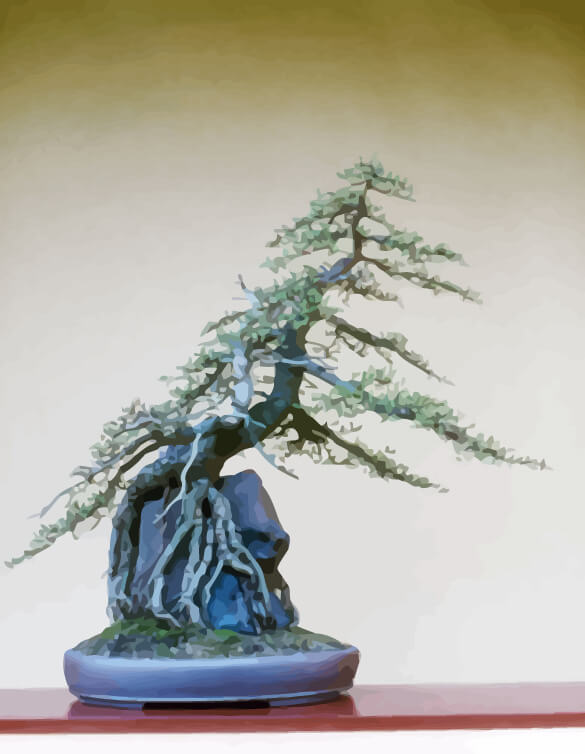
A Complete Rock Planting
In this clasped-to-rock style of bonsai, the impression of a mature, dramatic landscape is created in a very short space of time. Although the plants are still relatively young, they already look as though they have been growing on this rock for many years. The passage of time can only enhance further an already striking and established-looking bonsai design.
Planting a Clasped-to-Rock Design
The collected piece of Japanese Ibigawa rock chosen for this design already had a very attractive combination of texture and color. It was subsequently cut and chiseled to refine its shape. Acid was used to eat away the softer parts and make the surface more irregular. Sawing the base flat gave added stability.
Preparing the Materials
The rock was examined carefully to find the best view for the front, and to establish the design of the planting – a simulation of small trees clinging tenaciously to a rocky outcrop or island. Several young, partly trained white pines, and other small plants, were selected to establish the correct sense of scale.
After assembling all the necessary materials, the trees were held up against the rock to check their proportions and shapes, and to choose the best places for planting them, places where they would complement the characteristics of the rock.
How to Prepare Anchorage Wires
In a clasped-to-rock planting, you need anchorage wires to fix plants to the rock. Cut a length of wire and hold the center against a fine chopstick or knitting needle, or any tool about ‘Am (6mm) in diameter with a tapered end. Wind the center of the wire once around the chopstick to form a circle or base, leaving two long ends. Slip the circle of wire off the chopstick, and hold it down flat with pliers while you pull each end of the wire up vertically. Glue the circle of wire to the rock, leaving the long ends free. Make sufficient of these anchorage wires to form a network that will hold down the roots of all the plants.
Finding the Best Angle
Before starting to design the planting, study the rock from all sides, choosing the most interesting aspect for the front view.
The Choice of Materials
The three white pines (Pinus parviflora) are all about^ 4 inches (10 cm) tall. Other plants are included to enhance j the idea of a lone island, and for textural and color interest. Well-soaked mosses complete the planting. You will need anchorage wires and a strong adhesive. Planting is in peat muck.
The Clasped-to-Rock Planting
- Use a strong, waterproof adhesive, such as epoxy resin, or the quick-drying bonsai adhesive that is imported from Japan (beware of sticking your ringers!) to stick the prepared anchorage wires to parts of the rock where you plan to plant the trees. There should be enough wires in place to provide a web-like framework that will secure all the roots.
- Take some pre-soaked peat muck (one part peat to one part clay, presoaked and kneaded into a sticky mass) and press a layer on to the part of the rock where you intend to plant the first tree. Set the tree in position, carefully spread its roots over the peat muck, and cover them with some more peat muck.
- Cross the anchorage wires over the roots. It is better to bring together two individual wires from different anchorages rather than fix the two ends of one anchorage wire to each other. To fasten the wires, grasp the ends of each wire with pliers. Twist them together, taking care not to allow the wires to bite into the roots, and fix the tree in place.
- Add some more peat muck and press it in place over the roots of the tree, so that they are covered completely. Keep the peat muck continually moist, using a mist-sprayer of water if necessary, until you cover it up with moss (see step 6). The moss should've been soaked in water for several hours before being used the planting.
- Fix the other plants in position in the same way as the first one. You should secure the pines first, followed by the smaller plants. If necessary, keep spraying the peat muck with the mist-sprayer, so that it stays damp.
- When all the plants have been positioned, cover the peat muck with soaked moss. This will make the planting look attractive and will also help to prevent erosion. Set the whole rock in a shallow tray. Scatter some fine gravel in the tray and top up with a little water. The water will set off the design and provide a humid atmosphere for the plants.
Root-Over-Rock Style
Bonsai designed in root-over-rock style are recreating situations in mountainous or rocky terrain where trees grow up from seeds deposited in crevices. Desperately seeking food and moisture, the roots of such small trees fan out over the rock. When at last the tips locate some soil and sink into it, the exposed parts of the roots thicken up as they cling tightly to their rocky support.
In bonsai, trees that naturally form strong surface roots, like Chinese elms and trident maples, are popular for root-over-rock designs. You can use many other species, especially with smaller bonsai sizes which do not need such excessively heavy roots. It is essential to choose a suitable rock, as the tree's roots fuse with it to make it a permanent part of the planting. Choose a very hard, frost-resistant rock, with an interesting, craggy texture – not a soft rock that will crumble in frost, or one with a boringly flat surface.
The most popular choice is Japanese Ibigawa rock, available all over the world from bonsai suppliers. It fulfills all the bonsai criteria, being hard and rugged, with interesting colors and textures. In some areas, you may be able to find a local rock that will serve as a suitable substitute.
Training the Roots Over The Rock
- Use a root hook to comb out the roots. Shake off any remaining soil. Hold several pieces of the rock against the tree's roots to decide which has the best shape to fit snugly over it.
- Wrap the roots over the rock. You will need a helper to secure the roots at the top, middle, and base of the rock by binding on plastic tape, while you hold them firmly in place.
- The helper should bind all the roots tightly to the rock, covering them over to prevent any new horizontal roots from developing. Leave longer roots free at the base to grow downward.
- With a concave branch cutter, prune the tree back hard, trimming each branch to within no more than one or two buds from the trunk.
- Moisture is essential for new buds to grow. To prevent trimmed branches from drying out, seal their cut ends with wound sealant.
- Bury all the roots and the entire rock in a pot of clean, sharp sand, making sure that they are covered up to the base of the trunk. You do not need to use any other growing medium.
Potting the Tree
- Over the next year, water the tree in the pot each day during the growing season. Keep the sand just moist in winter. Feed every two weeks in summer. Prune vigorous new growth to within one or two buds of the trunk. After a year, follow steps 2 to 5.
- In late winter or early spring, roughly trim the branches. Remove the tree from its pot, and use a hose, watering can, or bowl of clean water to wash the roots and tape clean of sand.
- Cut away the tapes with small, sharp scissors – take care not to cut any roots. Unwrap and remove the plastic to release the rock and roots.
- The roots should have thickened and be clinging firmly to the rock. If not, rebind them, following steps 2 and 3. Replant the tree and rock in sand for another year.
- When satisfied with the way the roots have developed, choose the best front view. Trim the branches to suit this view. Plant the tree in a bonsai pot, treating the rock as an extension of the trunk.

Someone gave me a small bonaai tree with yellow and green leaves on a rock. I have no dea how to care for it!
Can I send you a picture?
Thank you for the opportunity.
Jennifer
What other options do I have except moss for top cover? I cannot keep moss alive.
I have some lava rock for bonsai planting, taken from a family ranch in Oregon. Do I need to 'sterilize' the rock to remove any possible bugs, toxic elements, to make it suitable for use with a bonsai plant? Should it be soaked in water, prior to attaching the roots?